Integration guide
This chapter aims to help you get started with Centrifugo. We will look at a step-by-step workflow of integrating your application with Centrifugo, providing links to relevant parts of this documentation.
As Centrifugo is language-agnostic and can be used together with any language/framework, we won't be specific here about any backend or frontend technology your application can be built with. Only abstract steps, which you can extrapolate to your application stack, are presented.
Let's look at a simplified scheme:
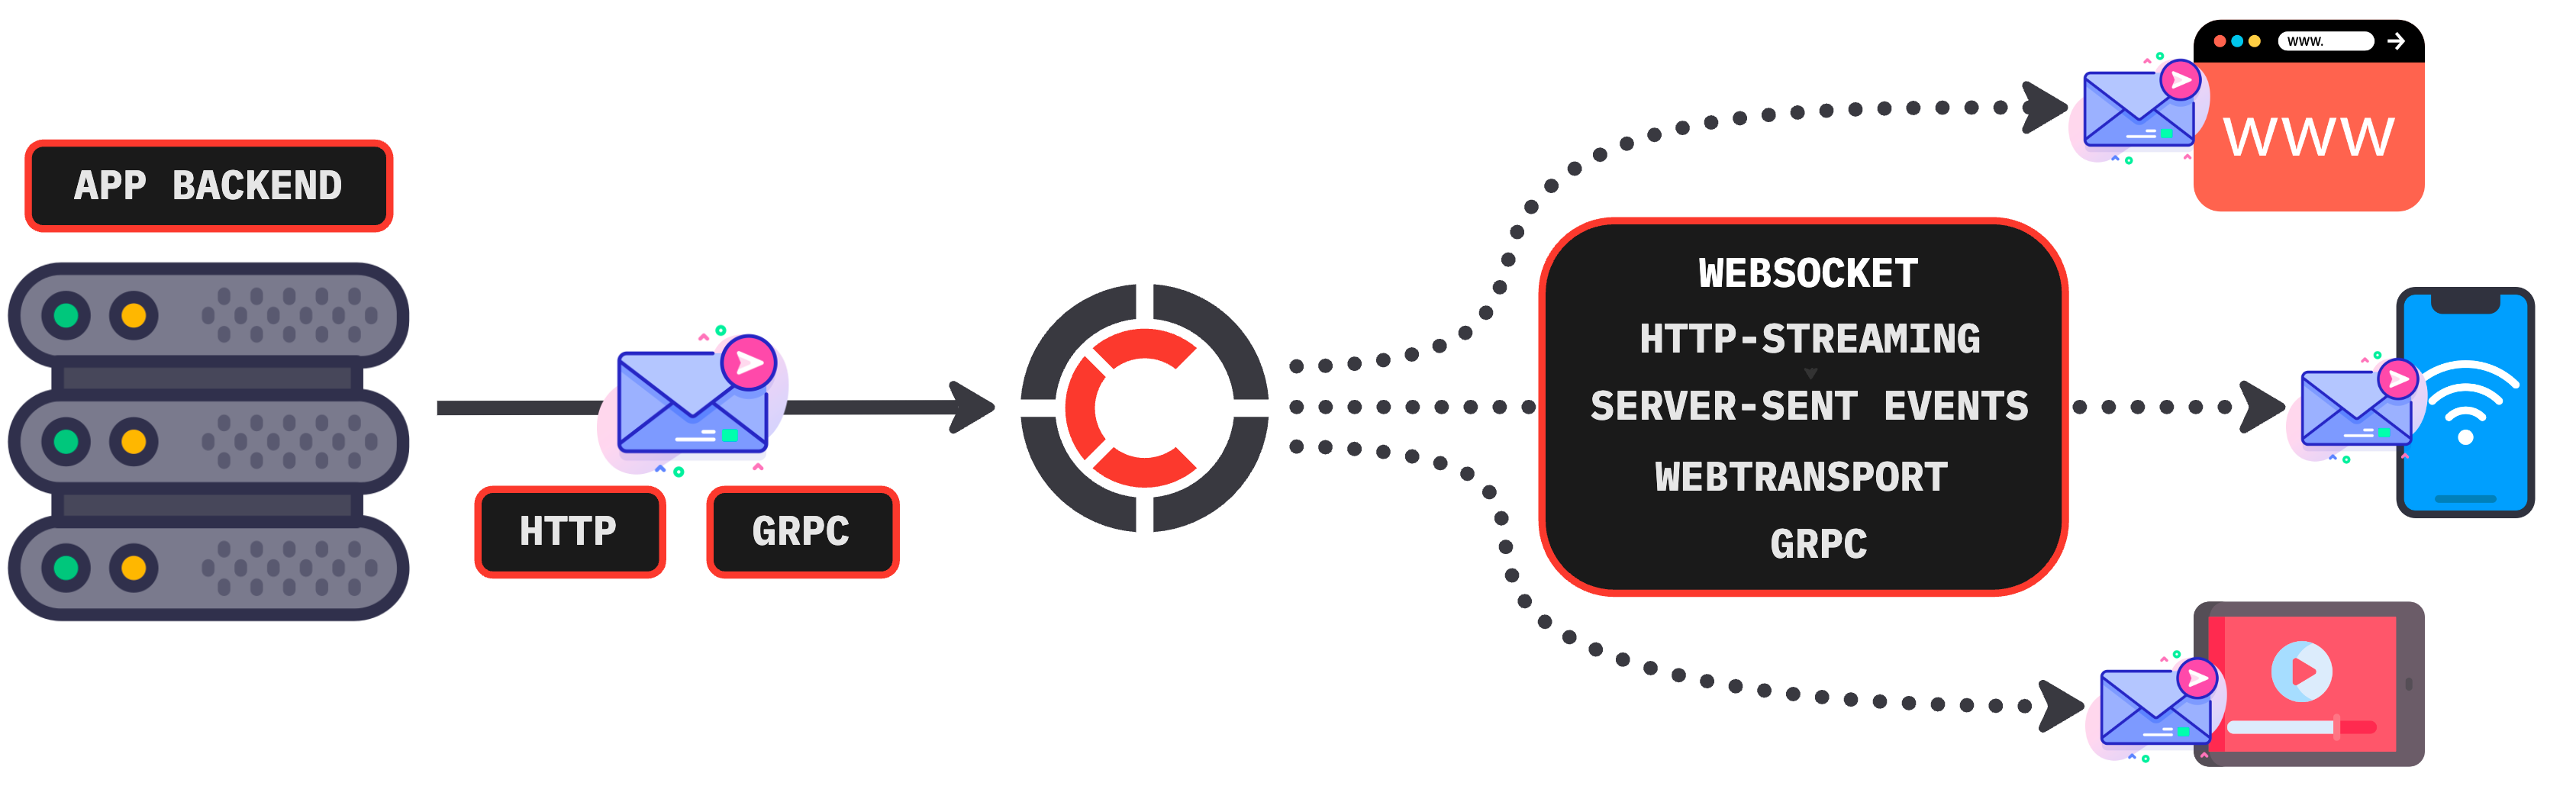
There are three parts involved in the idiomatic Centrifugo usage scenario:
- Your application backend
- Centrifugo
- Your clients (frontend application)
It's possible to use Centrifugo without any application backend involved, but here we won't consider this use case.
Here, let's suppose you already have 2 of the 3 elements: clients and the backend. Now you want to add Centrifugo to receive real-time events on the client-side.
0. Install
The first thing you need to do is download/install the Centrifugo server. See the install chapter for details.
1. Configure Centrifugo
Create a basic configuration file with client.token.hmac_secret_key (or client.token.rsa_public_key) and http_api.key set, and then run Centrifugo. See this chapter for details about client.token.hmac_secret_key/client.token.rsa_public_key and the chapter about server API for the API description. The simplest way to do this automatically is by using the genconfig command:
./centrifugo genconfig
– which will generate a config.json file for you with a minimal set of fields to start from.
Properly configure allowed_origins option.
2. Configure your backend
In the configuration file of your application backend, register several variables: the Centrifugo token secret (if you decided to stick with JWT authentication) and the Centrifugo API key you set in the previous step, as well as the Centrifugo API endpoint address. By default, the API address is http://localhost:8000/api. You must never reveal the token secret and API key to your users.
3. Connect to Centrifugo
Now your users can start connecting to Centrifugo. You should get a client library (see the list of available client SDKs) for your application frontend. Every library has a method to connect to Centrifugo. See information about Centrifugo connection endpoints here.
Every client should provide a connection token (JWT) upon connecting. You must generate this token on your backend side using the Centrifugo secret key you set in the backend configuration (note that in the case of RSA tokens, you are generating JWT with a private key). See how to generate this JWT in the special chapter.
You pass this token from the backend to your frontend app (pass it in the template context or use a separate request from the client-side to get a user-specific JWT from the backend side). And use this token when connecting to Centrifugo (for example, the browser client has a special method setToken).
There is also a way to authenticate connections without using JWT - see the chapter about proxying to the backend.
You connect to Centrifugo using one of the available transports.
4. Subscribe to channels
After connecting to Centrifugo, subscribe clients to channels they are interested in. See more about channels in the special chapter. All bidirectional client SDKs provide a way to handle messages coming to a client from a channel after subscribing to it. Learn more about client SDK possibilities from the client SDK API spec.
There is also a way to subscribe a connection to a list of channels on the server side at the moment of connection establishment. See the chapter about server-side subscriptions.
5. Publish to a channel
Everything should work now – as soon as a user opens some page of your application, they must successfully connect to Centrifugo and subscribe to a channel (or channels).
Now let's imagine you want to send a real-time message to users subscribed to a specific channel. This message can be a reaction to some event that happened in your app: someone posted a new comment, an administrator just created a new post, a user pressed the "like" button, etc. Anyway, this is an event your backend has just received, and you want to immediately send it to interested users.
You can do this using the Centrifugo HTTP API. To simplify your life, we have several API libraries for different languages. You can publish messages into a channel using one of those libraries, or you can simply follow the API description to construct API requests yourself - this is very simple. Centrifugo also supports a GRPC API. As soon as you have published a message to the channel, it must be delivered to your online clients subscribed to that channel.
6. Deploy to production
To put all this into production, you need to deploy Centrifugo on your production server. To help you with this, we have many things like a Docker image, rpm and deb packages, Nginx configuration. See the Infrastructure tuning chapter for some actions you have to do to prepare your server infrastructure for handling many persistent connections.
7. Monitor Centrifugo
Don't forget to configure metrics monitoring for your production Centrifugo setup. This may help you to understand what's going on with your Centrifugo setup, understand the number of connections, operation count, and latency distributions, etc.
8. Scale Centrifugo
As soon as you are close to machine resource limits, you may want to scale Centrifugo – you can run many Centrifugo instances and load-balance clients between them using the Redis engine (or using Redis-compatible server), or with a Nats broker. The Engines and scalability chapter describes available options in detail.
9. Read FAQ
That's all for the basics. The documentation actually covers a lot of other concepts Centrifugo server has: scalability, private channels, the admin web interface, SockJS fallback, Protobuf support, and more. And don't forget to read our FAQ – it contains a lot of useful information.