Quickstart tutorial ⏱️
In this tutorial we will build a very simple browser application with Centrifugo. Users will connect to Centrifugo over WebSocket, subscribe to a channel, and start receiving all channel publications (messages published to that channel). In our case, we will send a counter value to all channel subscribers to update counter widget in all open browser tabs in real-time.
First you need to install Centrifugo. In this example, we are using a binary file release which is fine for development. Once you have Centrifugo binary available on your machine you can generate minimal required configuration file with the following command:
./centrifugo genconfig
This helper command will generate config.json file in the working directory with a content like this:
{
  "token_hmac_secret_key": "bbe7d157-a253-4094-9759-06a8236543f9",
  "admin_password": "d0683813-0916-4c49-979f-0e08a686b727",
  "admin_secret": "4e9eafcf-0120-4ddd-b668-8dc40072c78e",
  "api_key": "d7627bb6-2292-4911-82e1-615c0ed3eebb",
  "allowed_origins": []
}
Now we can start a server. Let's start Centrifugo with a built-in admin web interface:
./centrifugo --config=config.json --admin
We could also enable the admin web interface by not using --admin flag but by adding "admin": true option to the JSON configuration file:
{
  "token_hmac_secret_key": "bbe7d157-a253-4094-9759-06a8236543f9",
  "admin": true,
  "admin_password": "d0683813-0916-4c49-979f-0e08a686b727",
  "admin_secret": "4e9eafcf-0120-4ddd-b668-8dc40072c78e",
  "api_key": "d7627bb6-2292-4911-82e1-615c0ed3eebb",
  "allowed_origins": []
}
And then running Centrifugo only with a path to a configuration file:
./centrifugo --config=config.json
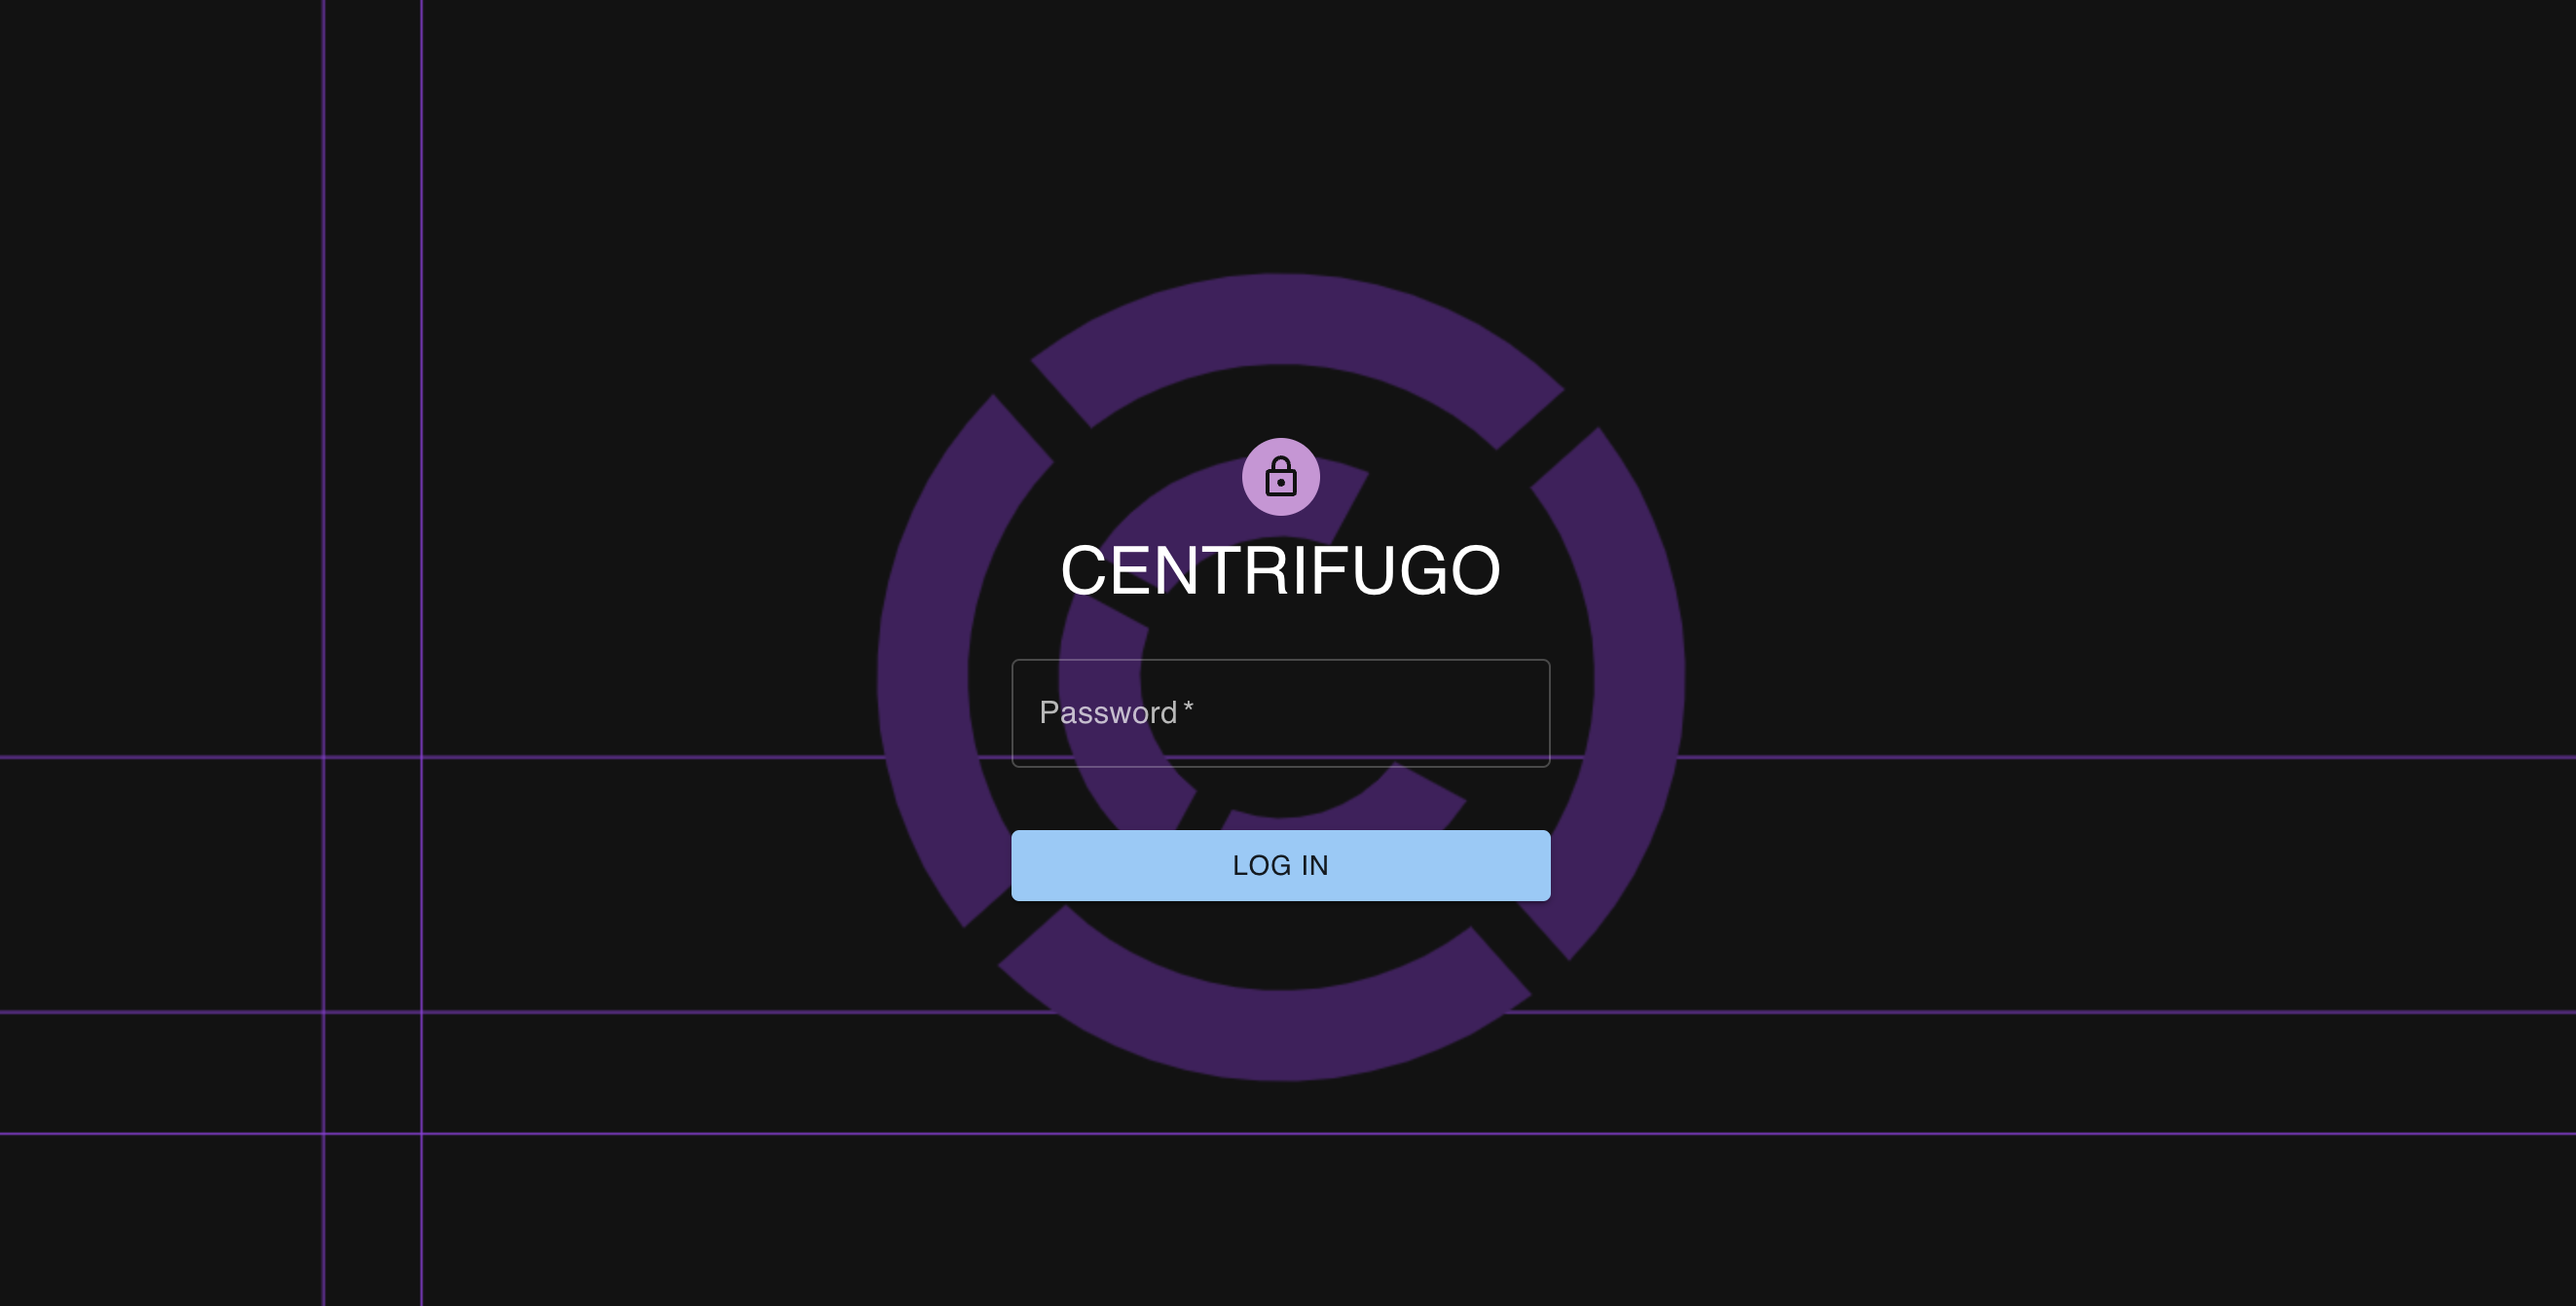
Now open http://localhost:8000. You should see Centrifugo admin web panel. Enter admin_password value from the configuration file to log in (in our case it's d0683813-0916-4c49-979f-0e08a686b727, but you will have a different value).
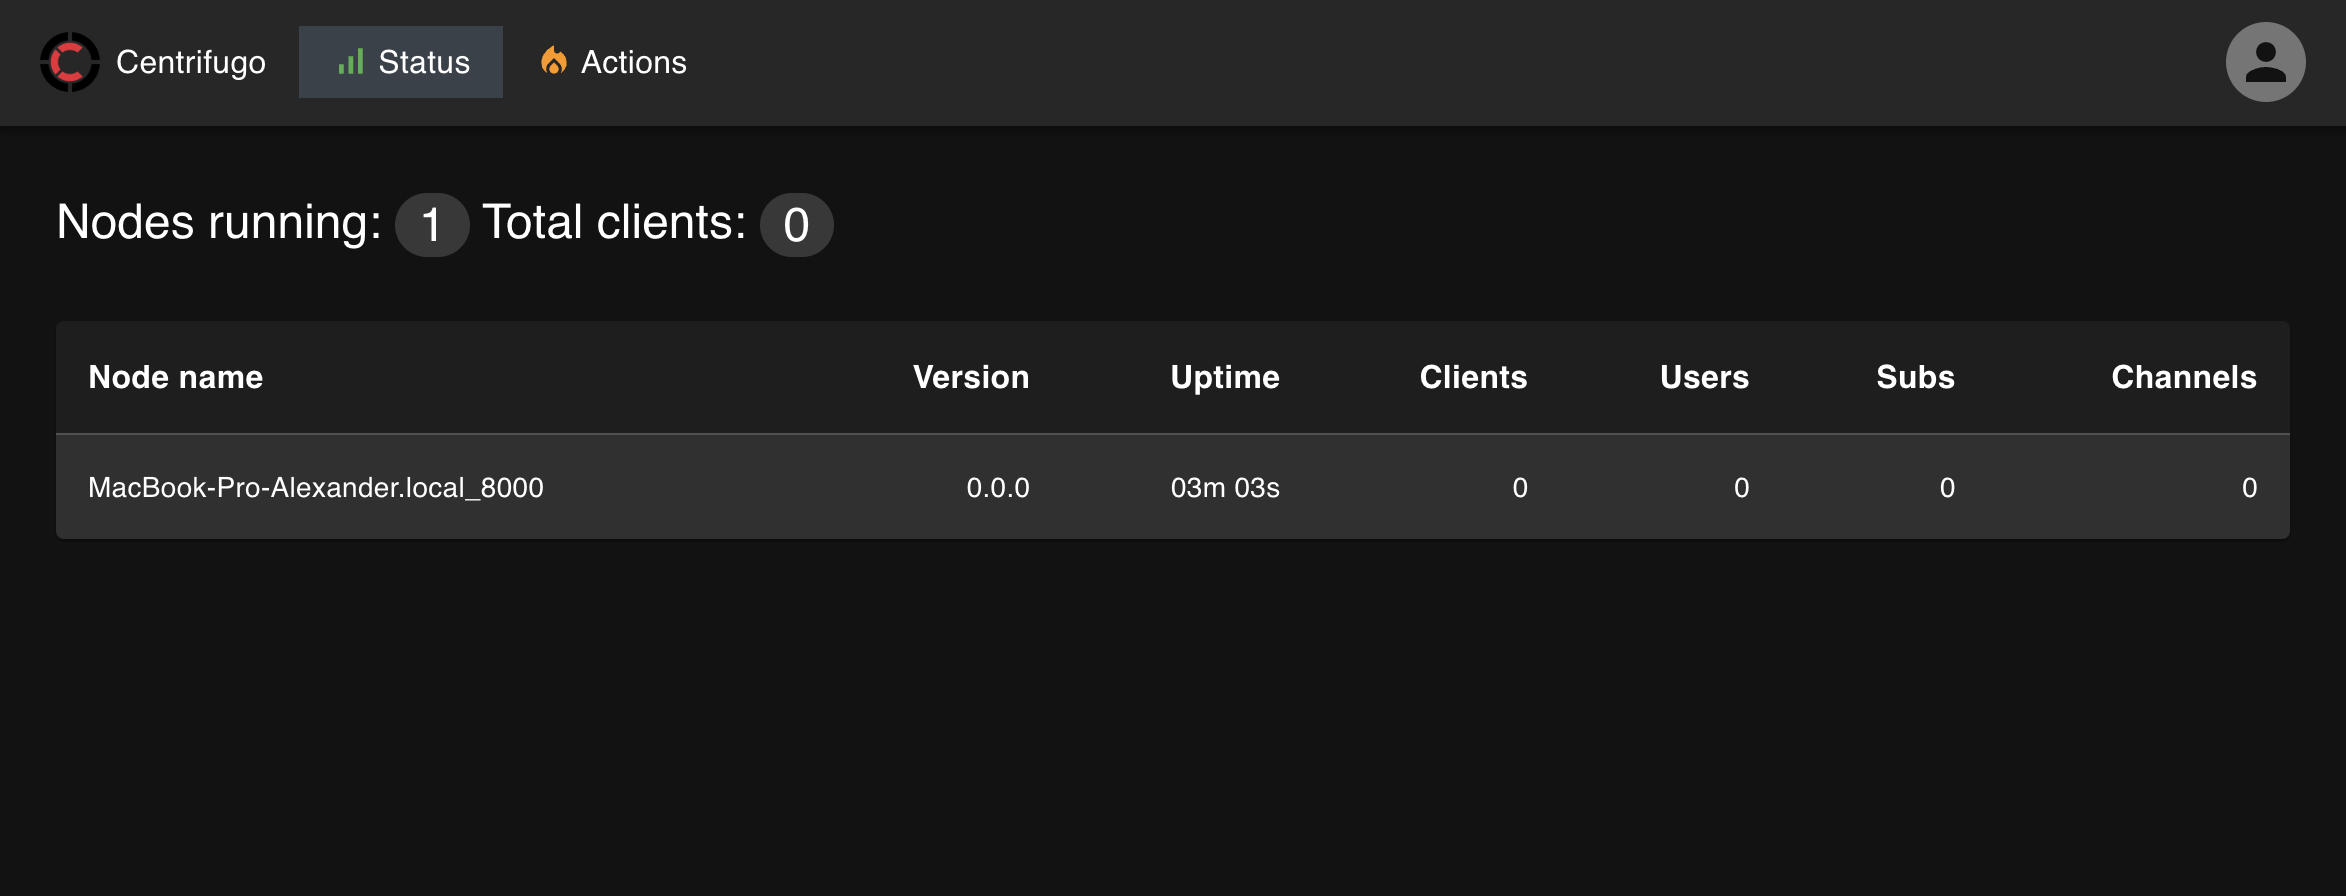
Inside the admin panel, you should see that one Centrifugo node is running, and it does not have connected clients:
Now let's create index.html file with our simple app:
<html>

<head>
  <title>Centrifugo quick start</title>
</head>

<body>
  <div id="counter">-</div>
  <script src="https://unpkg.com/centrifuge@3.1.0/dist/centrifuge.js"></script>
  <script type="text/javascript">
    const container = document.getElementById('counter');

    const centrifuge = new Centrifuge("ws://localhost:8000/connection/websocket", {
      token: "<TOKEN>"
    });

    centrifuge.on('connecting', function (ctx) {
      console.log(`connecting: ${ctx.code}, ${ctx.reason}`);
    }).on('connected', function (ctx) {
      console.log(`connected over ${ctx.transport}`);
    }).on('disconnected', function (ctx) {
      console.log(`disconnected: ${ctx.code}, ${ctx.reason}`);
    }).connect();

    const sub = centrifuge.newSubscription("channel");

    sub.on('publication', function (ctx) {
      container.innerHTML = ctx.data.value;
      document.title = ctx.data.value;
    }).on('subscribing', function (ctx) {
      console.log(`subscribing: ${ctx.code}, ${ctx.reason}`);
    }).on('subscribed', function (ctx) {
      console.log('subscribed', ctx);
    }).on('unsubscribed', function (ctx) {
      console.log(`unsubscribed: ${ctx.code}, ${ctx.reason}`);
    }).subscribe();
  </script>
</body>

</html>
Note that we are using centrifuge-js 3.1.0 in this example, getting it from CDN, you better use its latest version at the moment of reading this tutorial. In real Javascript app you most probably will load centrifuge from NPM.
In index.html above we created an instance of a Centrifuge client passing Centrifugo server default WebSocket endpoint address to it, then we subscribed to a channel called channel and provided a callback function to process incoming real-time messages (publications). Upon receiving a new publication we update page HTML and setting counter value to page title. We call .subscribe() to initialte subscription and .connect() method of Client to start a WebSocket connection. We also handle Client state transitions (disconnected, connecting, connected) and Subscription state transitions (unsubscribed, subscribing, subscribed) – see detailed description in client SDK spec.
Now you need to serve this file with an HTTP server. In a real-world Javascript application, you will serve your HTML files with a web server of your choice – but for this simple example we can use a simple built-in Centrifugo static file server:
./centrifugo serve --port 3000
Alternatively, if you have Python 3 installed:
python3 -m http.server 3000
These commands start a simple static file web server that serves the current directory on port 3000. Make sure you still have Centrifugo server running. Open http://localhost:3000/.
Now if you look at browser developer tools or in Centrifugo logs you will notice that a connection can not be successfully established:
2021-09-01 10:17:33 [INF] request Origin is not authorized due to empty allowed_origins origin=http://localhost:3000
That's because we have not set allowed_origins in the configuration. Modify allowed_origins like this:
{
  ...
  "allowed_origins": ["http://localhost:3000"]
}
Allowed origins is a security option for request originating from web browsers – see more details in server configuration docs. Restart Centrifugo after modifying allowed_origins in a configuration file.
Now if you reload a browser window with an application you should see new information logs in server output:
2022-06-10 09:44:21 [INF] invalid connection token error="invalid token: token format is not valid" client=a65a8463-6a36-421d-814a-0083c8836529
2022-06-10 09:44:21 [INF] disconnect after handling command client=a65a8463-6a36-421d-814a-0083c8836529 command="id:1  connect:{token:\"<TOKEN>\"  name:\"js\"}" reason="invalid token" user=
We still can not connect. That's because the client should provide a valid JWT (JSON Web Token) to authenticate itself. This token must be generated on your backend and passed to a client-side (over template variables or using separate AJAX call – whatever way you prefer). Since in our simple example we don't have an application backend we can quickly generate an example token for a user using centrifugo sub-command gentoken. Like this:
./centrifugo gentoken -u 123722
– where -u flag sets user ID. The output should be like this:
HMAC SHA-256 JWT for user "123722" with expiration TTL 168h0m0s:
eyJhbGciOiJIUzI1NiIsInR5cCI6IkpXVCJ9.eyJzdWIiOiIxMjM3MjIiLCJleHAiOjE2NTU0NDgyOTl9.mUU9s5kj3yqp-SAEqloGy8QBgsLg0llA7lKUNwtHRnw
– you will have another token value since this one is based on randomly generated token_hmac_secret_key from the configuration file we created at the beginning of this tutorial. See token authentication docs for information about proper token generation in a real application.
Now we can copy generated HMAC SHA-256 JWT and paste it into Centrifugo constructor instead of <TOKEN> placeholder in index.html file. I.e.:
const centrifuge = new Centrifuge("ws://localhost:8000/connection/websocket", {
    token: "eyJhbGciOiJIUzI1NiIsInR5cCI6IkpXVCJ9.eyJzdWIiOiIxMjM3MjIiLCJleHAiOjE2NTU0NDgyOTl9.mUU9s5kj3yqp-SAEqloGy8QBgsLg0llA7lKUNwtHRnw"
});
If you reload your browser tab – the connection will be successfully established, but the client still can not subscribe to a channel:
2022-06-10 09:45:49 [INF] client command error error="permission denied" client=88116489-350f-447f-9ff3-ab61c9341efe code=103 command="id:2 subscribe:{channel:\"channel\"}" reply="id:2 error:{code:103 message:\"permission denied\"}" user=123722
We need to give client a permission to subscribe on the channel channel. There are several ways to do this. For example, client can provide subscription JWT for a channel. But here we will use an option to allow all authenticated clients subscribe to any channel.
To do this let's extend a server configuration with allow_subscribe_for_client option:
{
  "token_hmac_secret_key": "bbe7d157-a253-4094-9759-06a8236543f9",
  "admin": true,
  "admin_password": "d0683813-0916-4c49-979f-0e08a686b727",
  "admin_secret": "4e9eafcf-0120-4ddd-b668-8dc40072c78e",
  "api_key": "d7627bb6-2292-4911-82e1-615c0ed3eebb",
  "allowed_origins": ["http://localhost:3000"],
  "allow_subscribe_for_client": true
}
A good practice with Centrifugo is configuring channel namespaces for different types of real-time features you have in the application. By defining namespaces you can achieve a granular control over channel behavior and permissions.
Restart Centrifugo – and after doing this everything should start working. Client can successfully connect and successfully subscribe to a channel now.
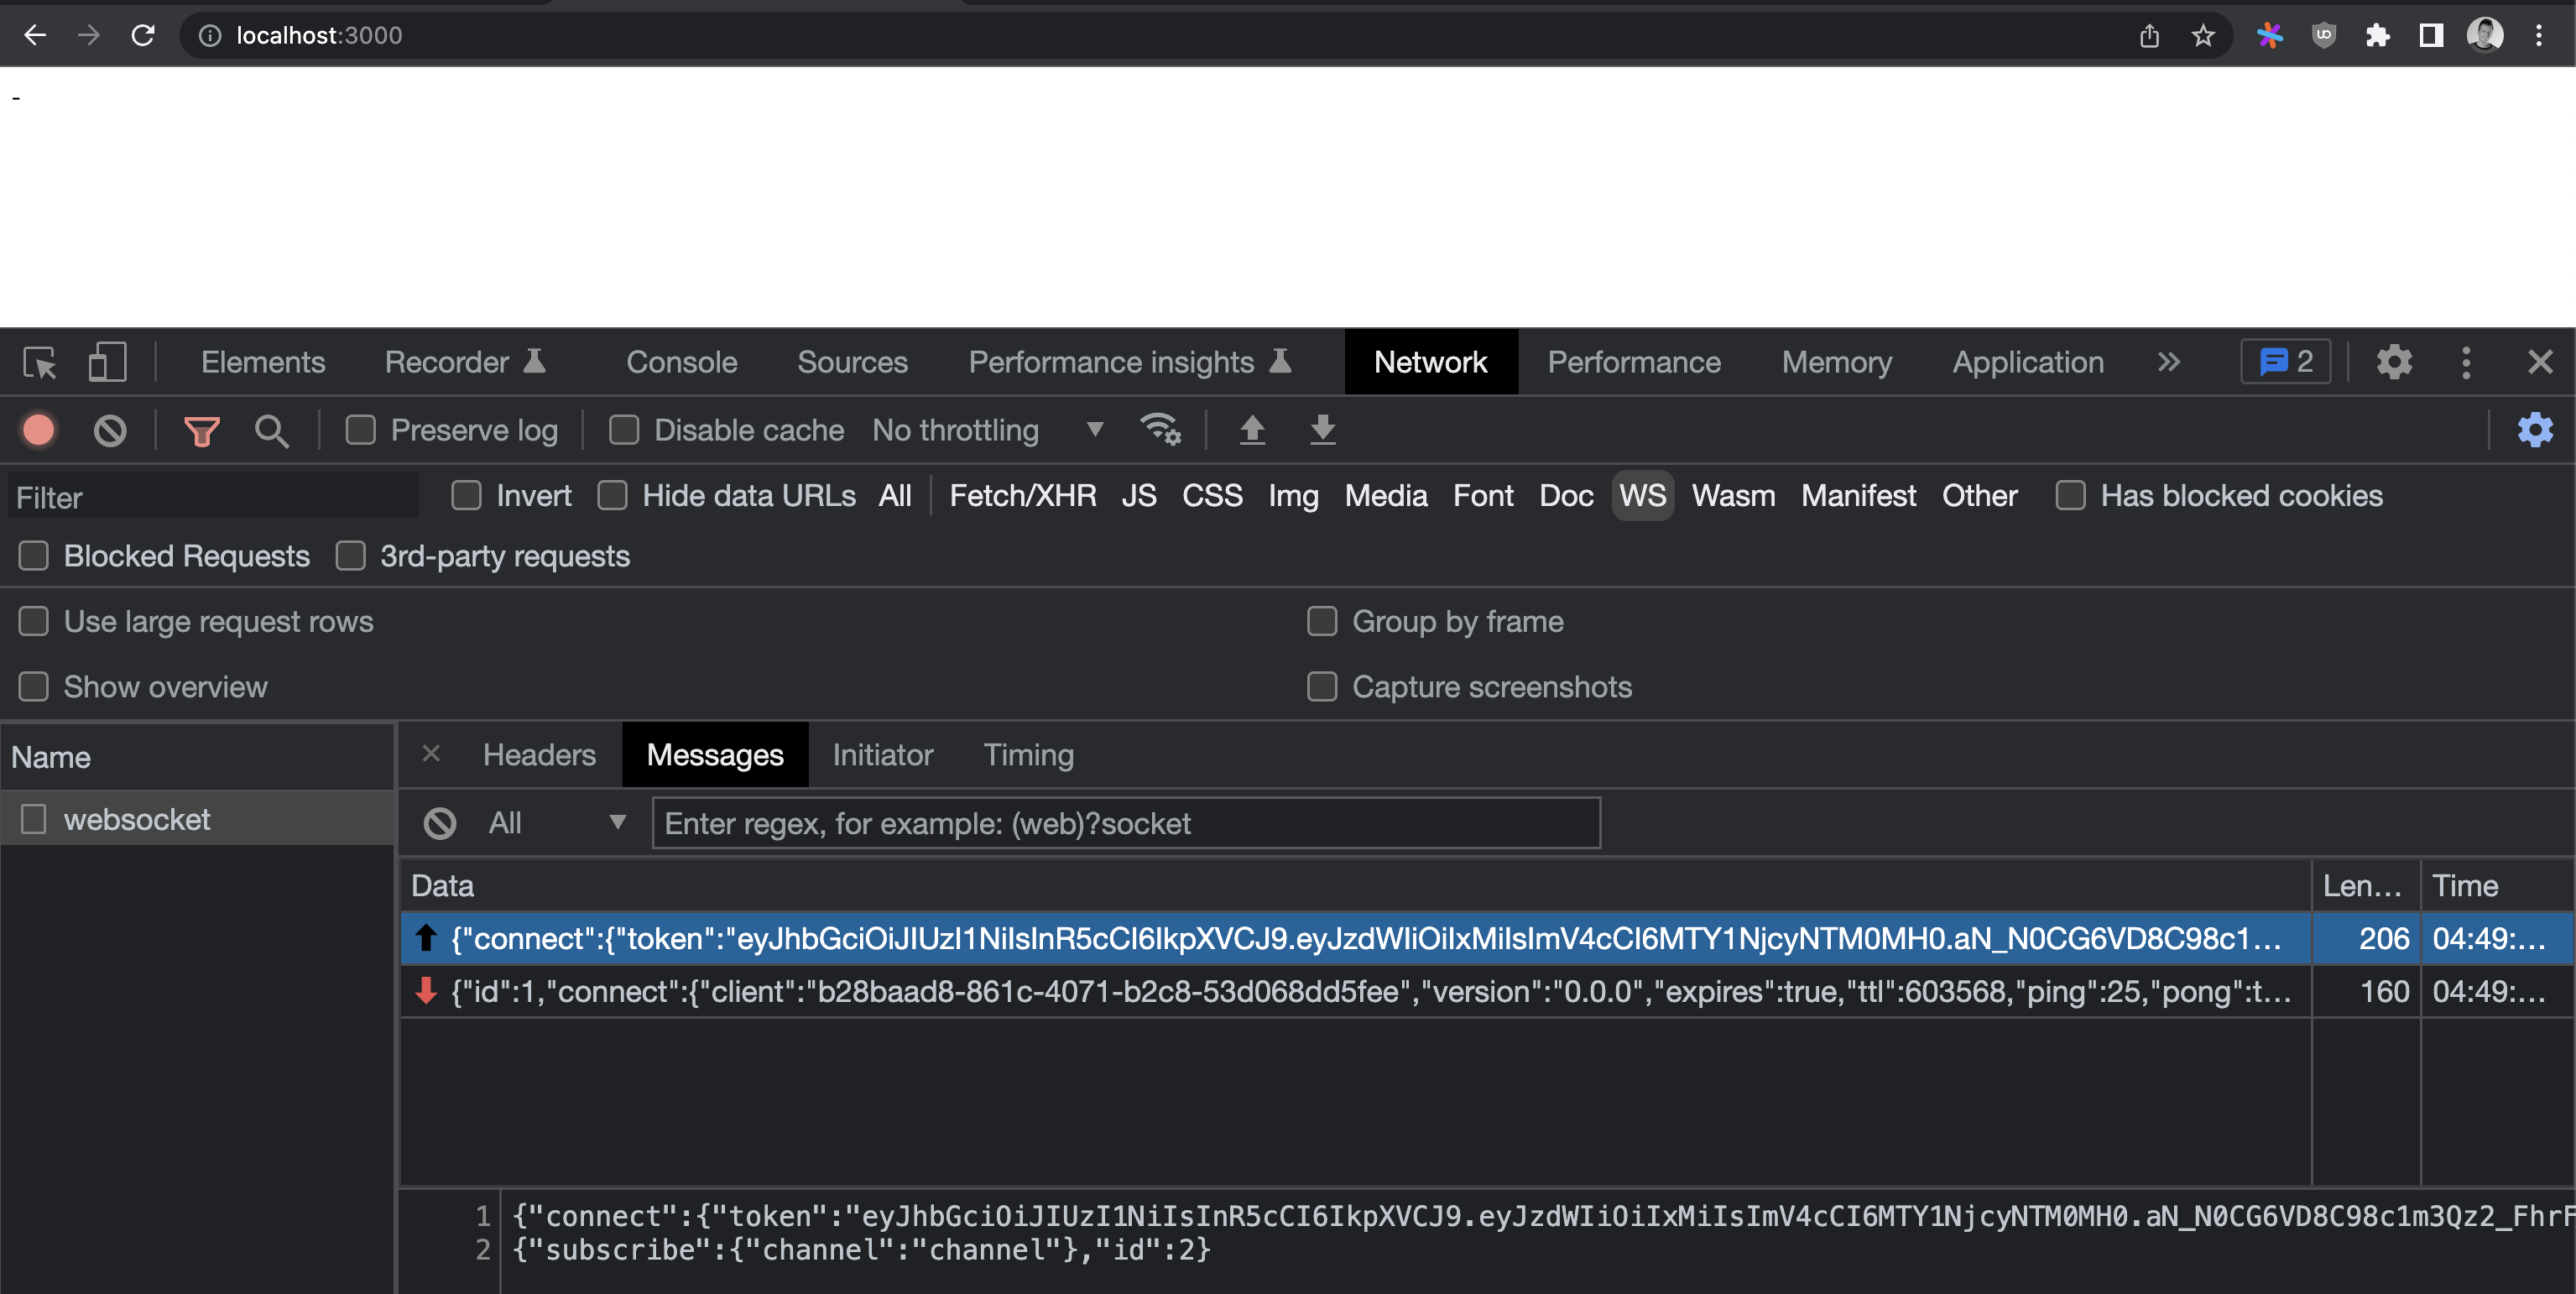
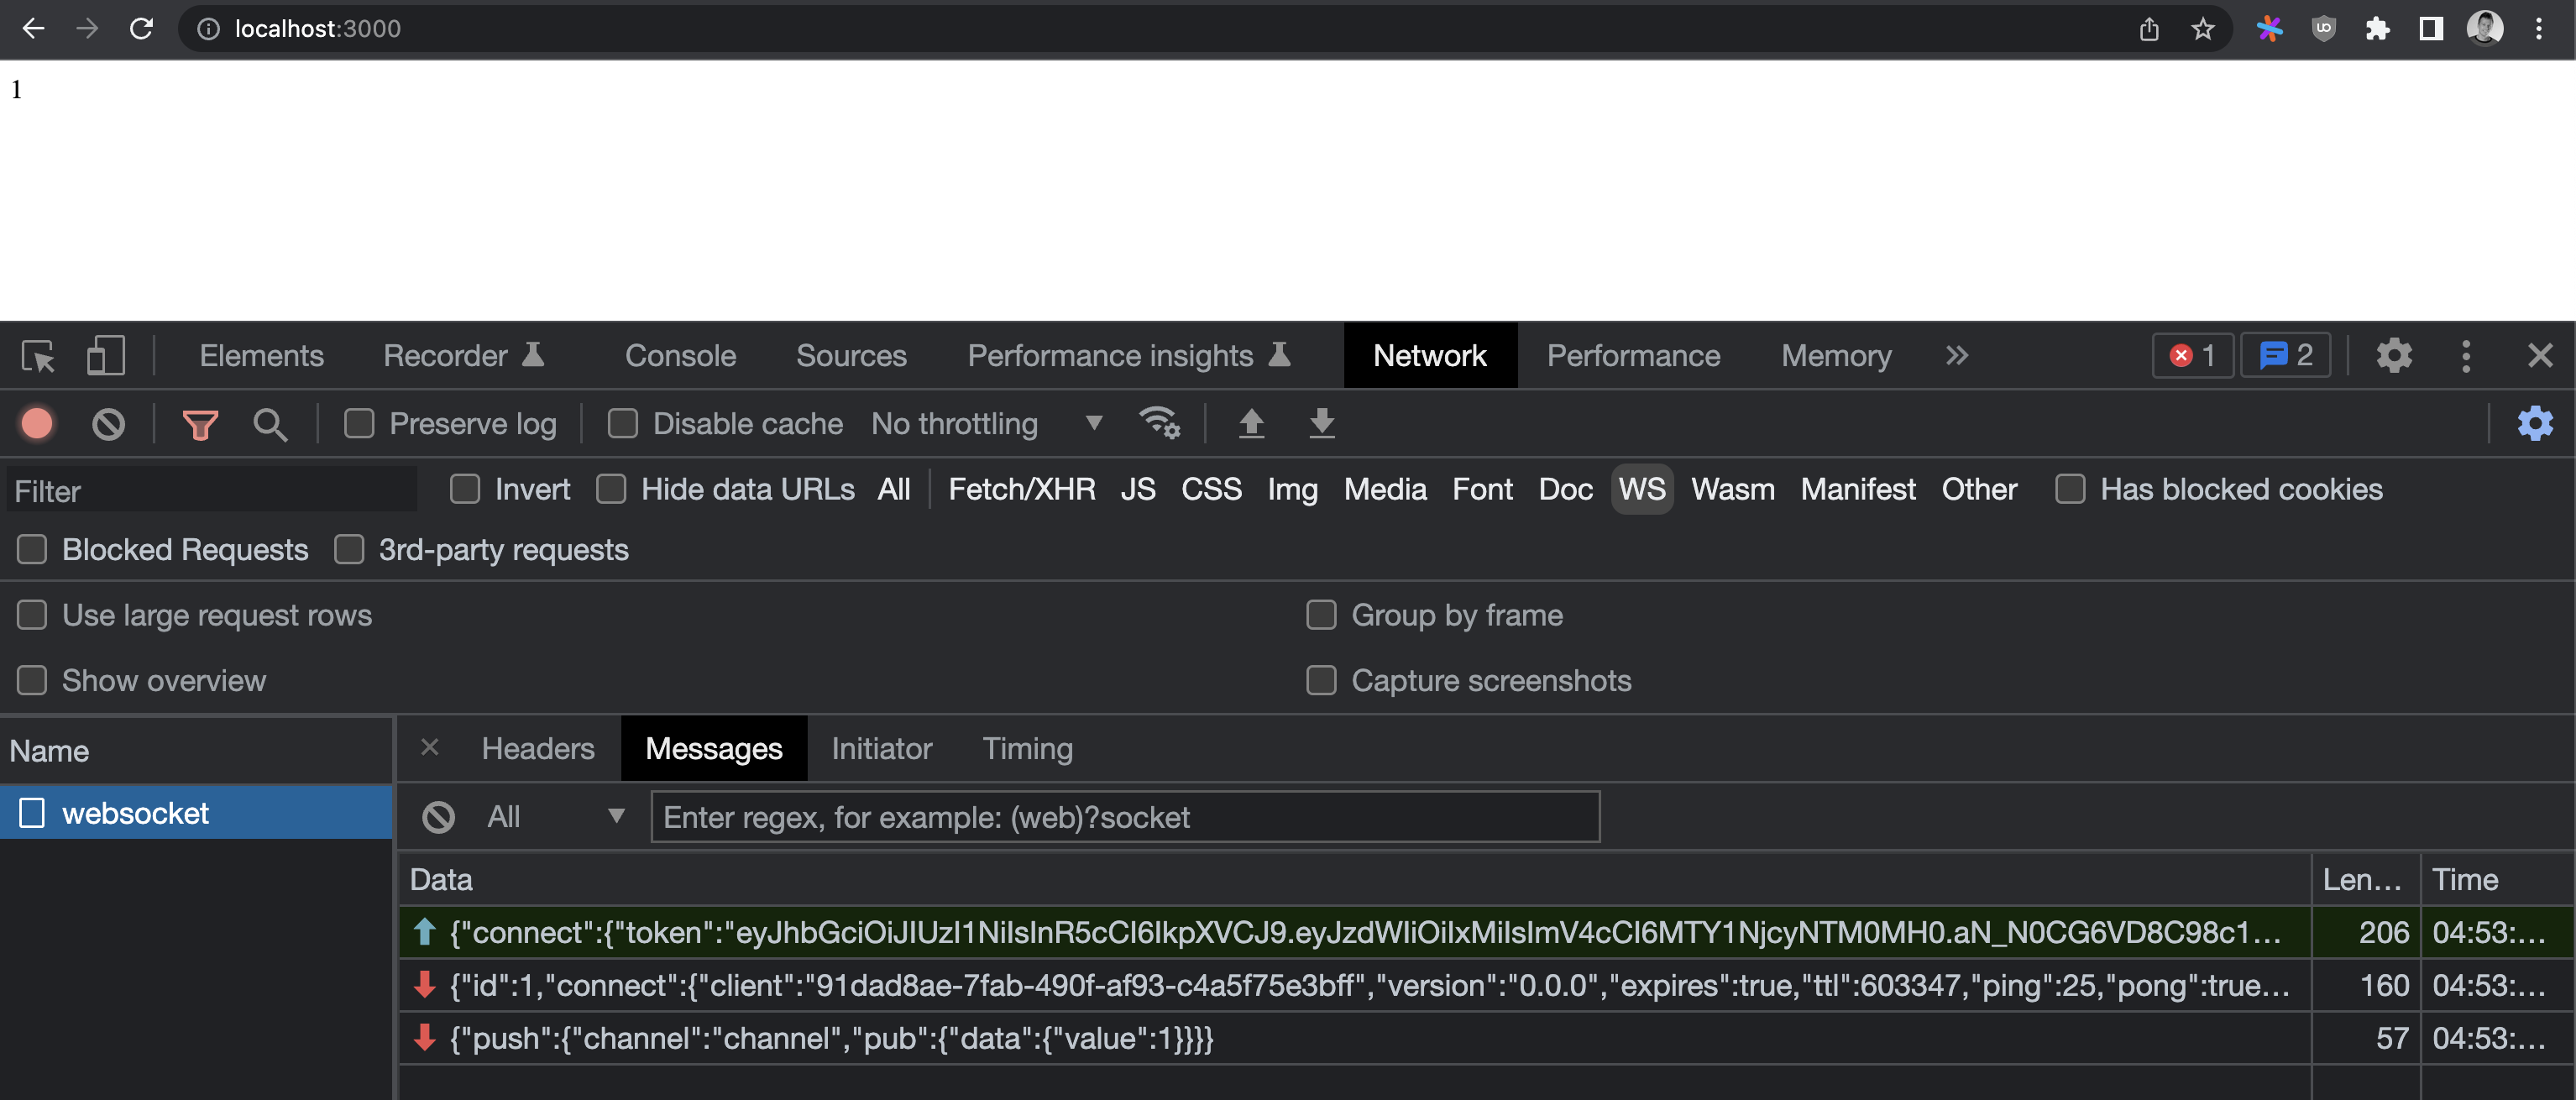
Open developer tools and look at WebSocket frames panel, you should see sth like this:
Note, that in this example we generated connection JWT – but it has expiration time, so after some time Centrifugo stops accepting those tokens. In real-life you need to add a token refresh function to a client to rotate tokens. See out client API SDK spec.
OK, the last thing we need to do here is to publish a new counter value to a channel and make sure our app works properly.
We can do this over Centrifugo API sending an HTTP request to default API endpoint http://localhost:8000/api, but let's do this over the admin web panel first.
Open Centrifugo admin web panel in another browser tab (http://localhost:8000/) and go to Actions section. Select publish action, insert channel name that you want to publish to – in our case this is a string channel and insert into data area JSON like this:
{
    "value": 1
}
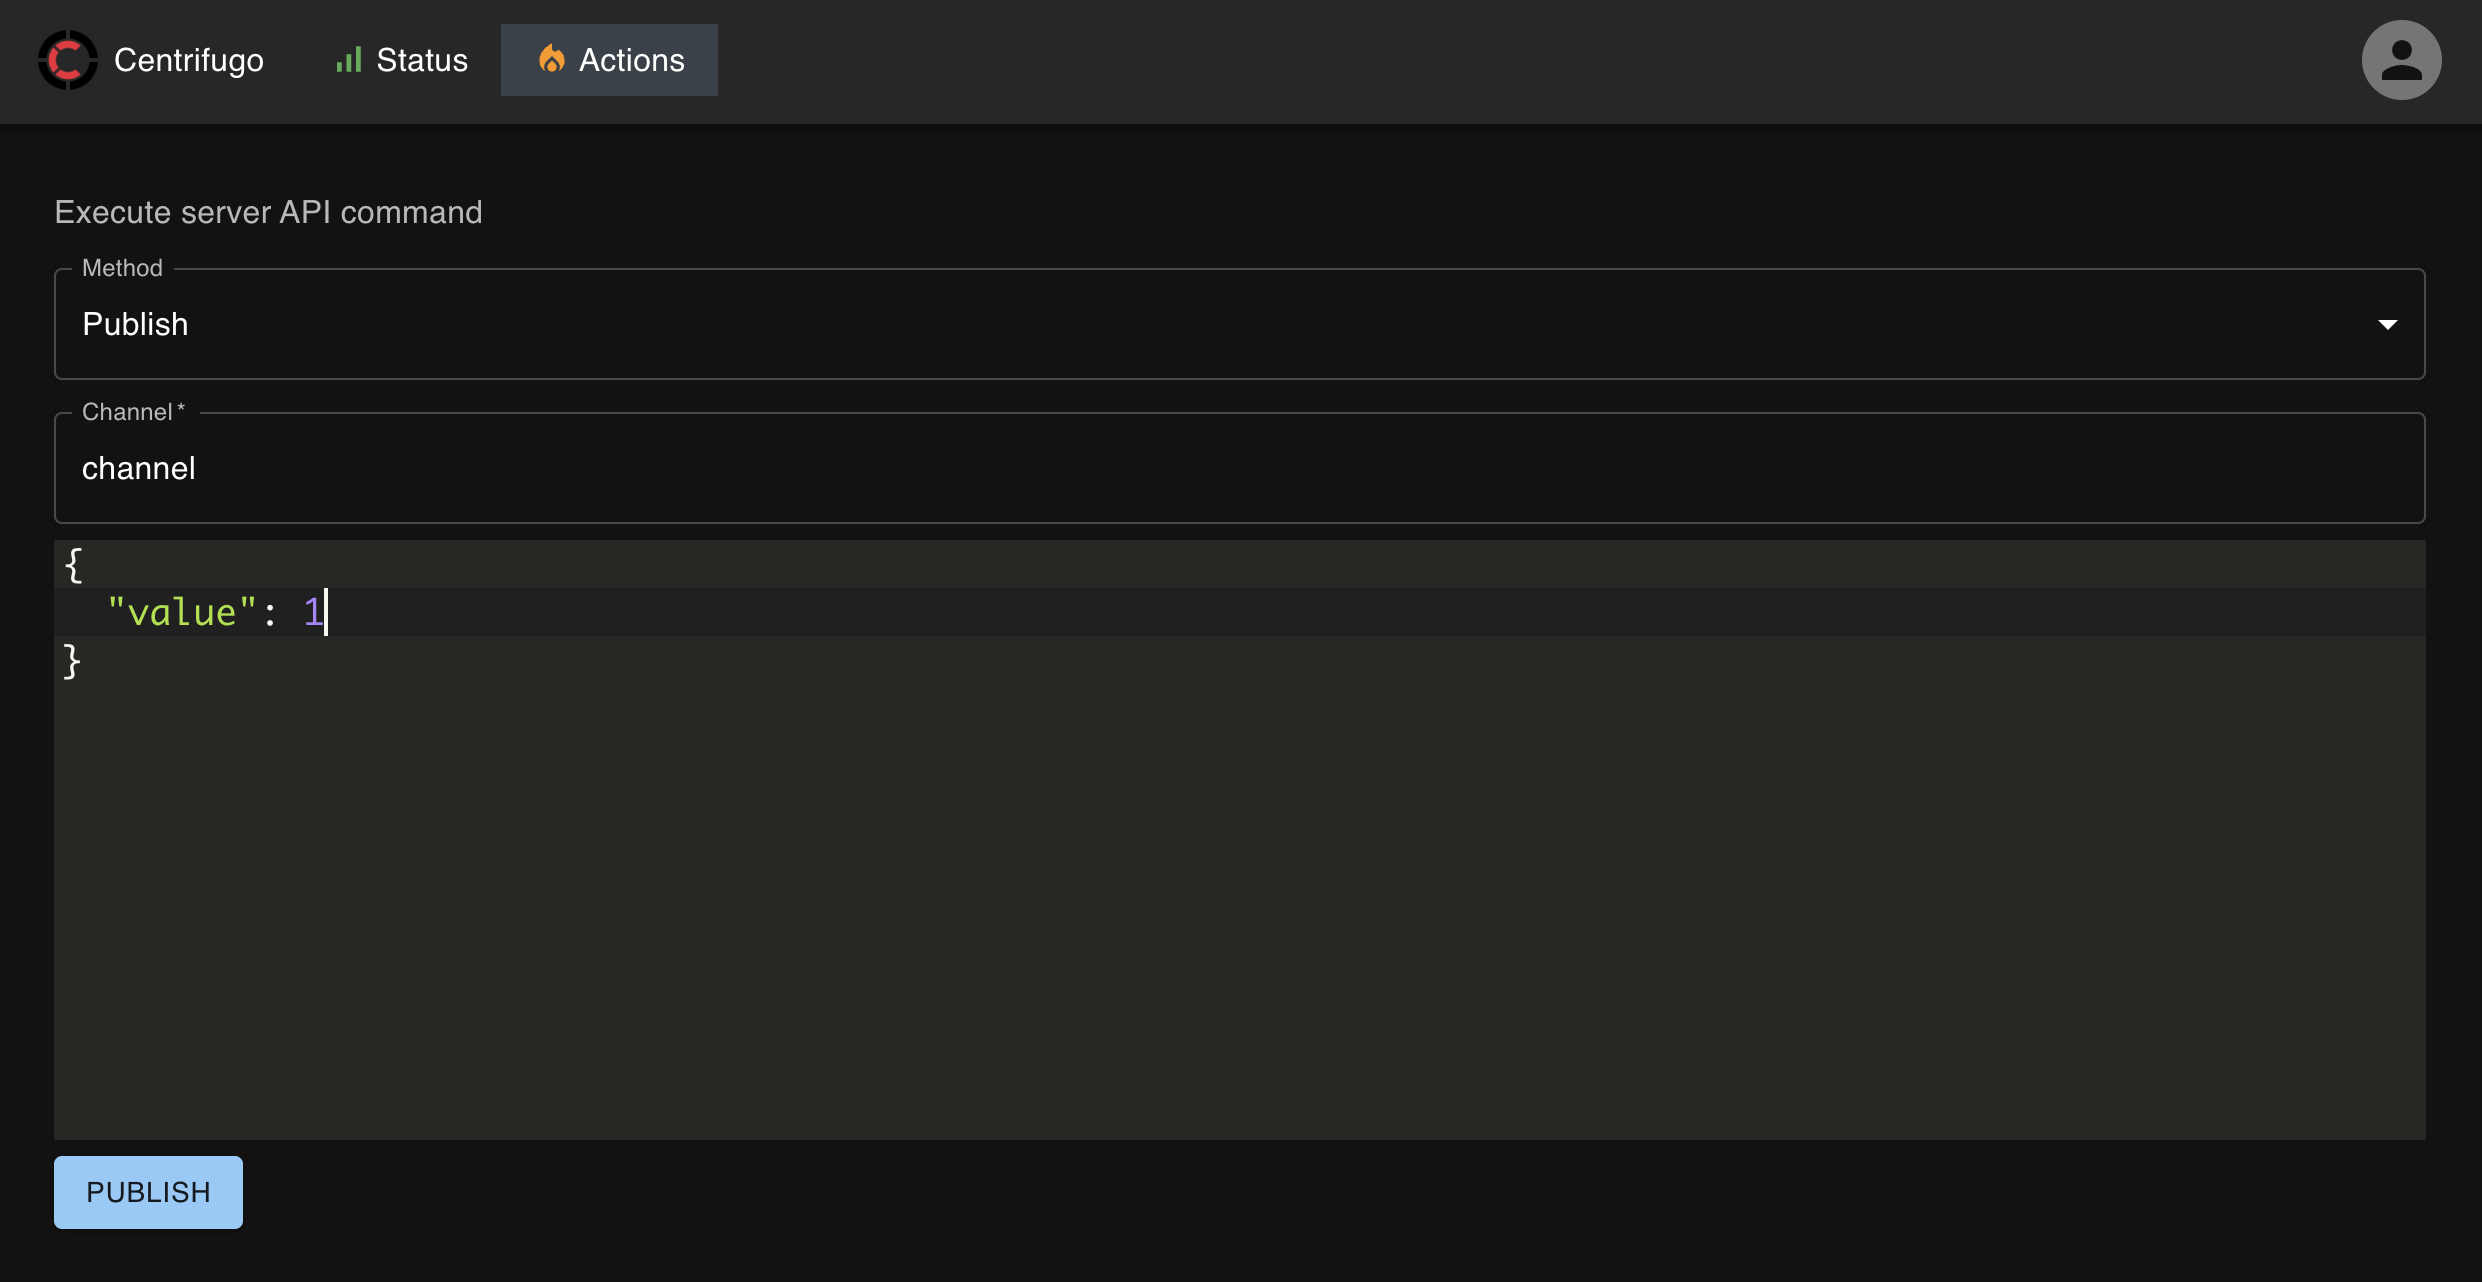
Click PUBLISH button and check out the application browser tab – counter value must be immediately received and displayed.
Open several browser tabs with our app and make sure all tabs receive a message as soon as you publish it.
BTW, let's also look at how you can publish data to a channel over Centrifugo server API from a terminal using curl tool:
curl --header "Content-Type: application/json" \
  --header "Authorization: apikey d7627bb6-2292-4911-82e1-615c0ed3eebb" \
  --request POST \
  --data '{"method": "publish", "params": {"channel": "channel", "data": {"value": 2}}}' \
  http://localhost:8000/api
– where for Authorization header we set api_key value from Centrifugo config file generated above.
We did it! We built the simplest browser real-time app with Centrifugo and its Javascript client. It does not have a backend, it's not very useful, to be honest, but it should give you an insight on how to start working with Centrifugo server. Read more about Centrifugo server in the next documentations chapters – it can do much much more than we just showed here. Integration guide describes a process of idiomatic Centrifugo integration with your application backend.