Building a real-time WebSocket leaderboard with Centrifugo and Redis
In this article, we create a real-time leaderboard using Centrifugo, Redis, React and Python. Here we show the usage of Centrifugo built-in asynchronous consumer from Redis Stream. The post additionally showcases Fossil delta compression and cache recovery mode.
Centrifugo v6.2.0 added a bunch of new asynchronous consumers and new publish API fields such as version and version_epoch. Here, we are covering these changes by a new tutorial.
In the tutorial, we'll build a real-time leaderboard application that updates dynamically as scores change. We'll use Centrifugo for real-time updates, Redis for storing leaderboard data, React for the frontend, and some Python to trigger ranking changes. This is a nice example of how Centrifugo can be used to create interactive, real-time applications with minimal effort.
How application works
Our application will:
- Simulate score updates for a set of players
- Keep the leaderboard data in Redis ZSET (Sorted Set) data structure
- Atomically push leaderboard state to Redis STREAM data structure
- Use Centrifugo to consume Redis Stream and push real-time updates to subscribed clients
- Display the leaderboard with real-time updates and smooth animations when rankings change
Tutorial source code
Jump directly to the tutorial source code which may be found on Github. Clone the repo, cd into leaderboard directory and run:
docker compose up
Project Structure
Here's the structure of our project:
leaderboard/
├── backend/
│   ├── app.py                 # Python backend service
│   ├── Dockerfile             # Backend Docker configuration
│   ├── requirements.txt       # Python dependencies
│   └── lua/
│       └── update_leaderboard.lua  # Redis Lua script
├── centrifugo/
│   └── config.json            # Centrifugo configuration
├── nginx/
│   └── nginx.conf             # Nginx configuration
├── web/
│   ├── public/                # React public assets
│   ├── src/                   # React source code
│   ├── Dockerfile             # Frontend Docker configuration
│   └── package.json           # Frontend dependencies
└── docker-compose.yml         # Docker Compose configuration
A docker-compose.yml file is used to combine all the parts together:
version: "3.8"

services:
  redis:
    image: redis:7
    ports:
      - "6379:6379"

  centrifugo:
    image: centrifugo/centrifugo:v6.2.0
    volumes:
      - ./centrifugo/config.json:/centrifugo/config.json
    command: centrifugo --config=/centrifugo/config.json
    ports:
      - "8000:8000"
    depends_on:
      redis:
        condition: service_started

  backend:
    build: ./backend
    depends_on:
      redis:
        condition: service_started
      centrifugo:
        condition: service_started

  nginx:
    image: nginx:alpine
    restart: always
    ports:
      - 8080:80
    volumes:
      - ./nginx/nginx.conf:/etc/nginx/conf.d/default.conf
    depends_on:
      backend:
        condition: service_started
      web:
        condition: service_started

  web:
    build: ./web
    volumes:
      - ./web:/app
      - /app/node_modules
    ports:
      - "3000:3000"
    command: sh -c "npm install && npm start"
Here we use Redis to keep leaderboard data because it has a nice ZSET data structure which is famous for its fit for the leaderboard's use case – it's very efficient since data is being managed in-memory, allowing for fast read and write operations.
Redis also provides a Lua scripting engine that allows us to perform atomic operations on the data. We use lua scripting actively in Centrifugo Redis integrations, and here we will also utilize the power of it to atomically fill Redis STREAM which will be consumed by Centrifugo.
Building the Backend Service
The backend in this tutorial is very thin and is responsible only for simulating score updates. Here is the whole Python code which triggers ranking updates in Redis:
import time
import random
import redis

def main():
    r = redis.Redis(host='redis', port=6379)

    with open('lua/update_leaderboard.lua', 'r') as f:
        lua_script = f.read()

    update_leaderboard = r.register_script(lua_script)

    leader_names = [
        "Alice", "Bob", "Charlie", "David", "Eve",
    ]

    while True:
        leader = random.choice(leader_names)
        increment = random.randint(1, 10)
        channel = "leaderboard"
        update_leaderboard(
            keys=["leaderboard", "leaderboard-state", "leaderboard-stream"],
            args=[leader, increment, channel]
        )
        time.sleep(0.2)

if __name__ == "__main__":
    main()
This Python script:
- Connects to Redis
- Loads the Lua script for updating the leaderboard
- Randomly selects a player and increments their score
- Calls the Lua script to update the leaderboard in Redis
- Repeats this process every 0.2 seconds
Lua script in backend/lua/update_leaderboard.lua is more interesting:
-- Get or create state hash containing both epoch and version
local leaderboard_key = KEYS[1]
local state_key = KEYS[2]
local stream_key = KEYS[3]

local name = ARGV[1]
local score_inc = tonumber(ARGV[2])
local channel = ARGV[3]

-- Increment leaderboard score
redis.call('ZINCRBY', leaderboard_key, score_inc, name)

local epoch = redis.call("HGET", state_key, "epoch")
if not epoch then
    local t = redis.call("TIME")
    epoch = tostring(t[1])
    redis.call("HSET", state_key, "epoch", epoch, "version", 0)
end
-- Increment version atomically using HINCRBY
local version = redis.call("HINCRBY", state_key, "version", 1)
-- Always update TTL regardless of whether state is new or existing
redis.call("EXPIRE", state_key, 86400) -- Set TTL (24 hours, adjust as needed)

-- Get leaderboard data
local members = redis.call('ZREVRANGE', leaderboard_key, 0, -1, 'WITHSCORES')
local leaders = {}
for i = 1, #members, 2 do
    table.insert(leaders, { name = members[i], score = tonumber(members[i+1]) })
end

-- Prepare payload for Centrifugo publish API command.
local publish_payload = {
  channel = channel,
  data = { leaders = leaders },
  version = version, -- a tip for Centrifugo about state version
  version_epoch = epoch, -- a tip for Centrifugo about state epoch
}

-- Add to stream which is consumed by Centrifugo.
local payload = cjson.encode(publish_payload)
redis.call('XADD', stream_key, 'MAXLEN', '~', 10000, '*',
  'method', 'publish', 'payload', payload)
return members
This Lua script:
- Increments a player's score in a Redis sorted set
- Maintains a HASH to give Centrifugo a tip about leaderboard state version and version epoch
- Retrieves the current leaderboard data and adds it to Redis STREAM together with version and version epoch fields. It adds it in a format which Centrifugo Redis Stream consumer understands.
1 and 3 are rather self-explaining. But why do we need to maintain leaderboard state incremental version and its epoch?
The reason is that Redis Stream concurrent consumers working with a consumer group cannot maintain message ordering. So, if you have several Centrifugo instances consuming from the same Redis Stream, they are not able to guarantee that messages are processed in the order they were added to the stream.
Starting from Centrifugo v6.2.0, we can use version and version_epoch fields to ensure that clients always receive the most up-to-date state of the leaderboard, even if messages are processed out of order. When Centrifugo receives publications with versions less or equal to those already seen – it skips them, so the client does not receive non-actual data. Of course, this makes sense in cases like the one in this tutorial, where we are publishing the entire state to a channel. An important note is that for version logic to work, we will need to enable Centrifugo history for channels since version information is kept by Centrifugo in the history stream meta information object.
The version is an incremental number, and the logic with it should be straightforward to understand. But why do we need version_epoch? The version_epoch is a string that is used to identify the generation of the data. Since Redis is an in-memory data store, it is possible that the data may be lost if the Redis server is restarted or if the data is evicted from memory. By using version_epoch and tracking its change, Centrifugo avoids a situation where the version counter is restarted and Centrifugo ignores all updates until version reaches the number seen before. Using version_epoch is optional – if it's not passed to Centrifugo, then Centrifugo only looks at the version field to make the decision.
Note that while we are using a single leaderboard in this tutorial, you can extend the Lua script to support multiple leaderboards by adding a leaderboard id/name to leaderboard ZSET and state HASH keys. The Redis STREAM key will stay the same – all updates will go through it, just use different channels in the publication object.
Configuring Centrifugo
Now let's configure Centrifugo to consume the Redis Stream and push updates to connected clients.
To do this, we need Centrifugo to consume the Redis Stream, so centrifugo/config.json may look like this:
{
   "client": {
      "insecure": true,
      "allowed_origins": ["*"]
   },
   "channel": {
      "without_namespace": {
         "history_size": 1,
         "history_ttl": "24h"
      }
   },
   "consumers": [
      {
         "enabled": true,
         "name": "leaderboard_redis",
         "type": "redis_stream",
         "redis_stream": {
            "address": "redis:6379",
            "streams": ["leaderboard-stream"],
            "consumer_group": "centrifugo",
            "num_workers": 8
         }
      }
   ]
}
This configuration consumes the Redis Stream and also enables insecure WebSocket connections, which is handy for tutorial purposes – so we don't need to think about client authentication and channel permissions here.
Another important thing here is that enabling channel history is required for version logic to work because Centrifugo keeps version data in the history meta information.
Creating the Frontend React Application
Initialize a new React application:
npx create-react-app web
Navigate to the web directory and install the dependencies:
cd web
npm install centrifuge motion bootstrap
Update web/src/App.js:
import React, { useState, useEffect } from 'react';
import { motion } from 'motion/react';
import { Centrifuge } from 'centrifuge';
import 'bootstrap/dist/css/bootstrap.min.css';
import './App.css';

function App() {
  const [state, setState] = useState({
    leaders: [],
    prevOrder: {},
    highlights: {},
  });

  useEffect(() => {
    const centrifuge = new Centrifuge("ws://localhost:8000/connection/websocket");
    const sub = centrifuge.newSubscription("leaderboard", {});

    sub.on('publication', (message) => {
      const data = message.data;

      setState(prevState => {
        const newHighlights = {};
        const newLeaders = data.leaders.map((leader, index) => {
          let highlightClass = "";
          const prevRank = prevState.prevOrder[leader.name];
          if (prevRank !== undefined) {
            if (prevRank > index) {
              highlightClass = "highlight-up";
            } else if (prevRank < index) {
              highlightClass = "highlight-down";
            }
          }
          if (highlightClass) {
            newHighlights[leader.name] = highlightClass;
          }
          return leader;
        });

        const newOrder = {};
        newLeaders.forEach((leader, index) => {
          newOrder[leader.name] = index;
        });

        return {
          ...prevState,
          leaders: newLeaders,
          prevOrder: newOrder,
          highlights: { ...prevState.highlights, ...newHighlights },
        };
      });
    });

    centrifuge.connect();
    sub.subscribe();

    return () => {
      sub.unsubscribe();
      centrifuge.disconnect();
    };
  }, []);

  return (
    <div className="container mt-5">
      <div className="card">
        <div className="card-header">Real-time Leaderboard with Centrifugo</div>
        <div className="card-body">
          <table className="table table-striped">
            <thead>
              <tr>
                <th scope="col" className="rank-col">Rank</th>
                <th scope="col">Name</th>
                <th scope="col">Score</th>
              </tr>
            </thead>
            <tbody>
              {state.leaders.map((leader, index) => (
                <motion.tr
                  key={leader.name}
                  layout
                  className={state.highlights[leader.name] || ''}
                >
                  <td className="rank-col">{index + 1}</td>
                  <td>{leader.name}</td>
                  <td>{leader.score}</td>
                </motion.tr>
              ))}
            </tbody>
          </table>
        </div>
      </div>
    </div>
  );
}

export default App;
This React component:
- Connects to Centrifugo via WebSocket
- Subscribes to the "leaderboard" channel
- Updates the UI when new leaderboard data is received
- Uses
motionanimations to highlight changes in rankings
File web/src/App.css has some CSS styles to make it look better. Here we skip it for brevity.
Configuring Nginx
Finally, let's add Nginx, which is useful to have a single app endpoint that proxies requests to the React frontend and Centrifugo WebSocket connection:
server {
    listen 80;
    server_name localhost;

    location / {
        proxy_pass http://web:3000;
        proxy_http_version 1.1;
        proxy_set_header Upgrade $http_upgrade;
        proxy_set_header Connection "upgrade";
        proxy_set_header Host $host;
    }

    location /connection/websocket {
        proxy_pass http://centrifugo:8000;
        proxy_http_version 1.1;
        proxy_set_header Upgrade $http_upgrade;
        proxy_set_header Connection "upgrade";
        proxy_set_header Host $host;
    }
}
Running the Application
Now that we have all the components set up, let's run the application:
docker compose up
Once everything is running, you can access the application at http://localhost:8080.
Adding Fossil delta compression
We are sending the full state in every publication now, but only part of the data changes. Centrifugo provides a Fossil delta compression algorithm which can be used to reduce the amount of data sent over the network.
First, let's look at how our WebSocket session looks now by opening the WebSocket tab in Chrome Dev Tools (right-click and open the image in a new tab to see better):
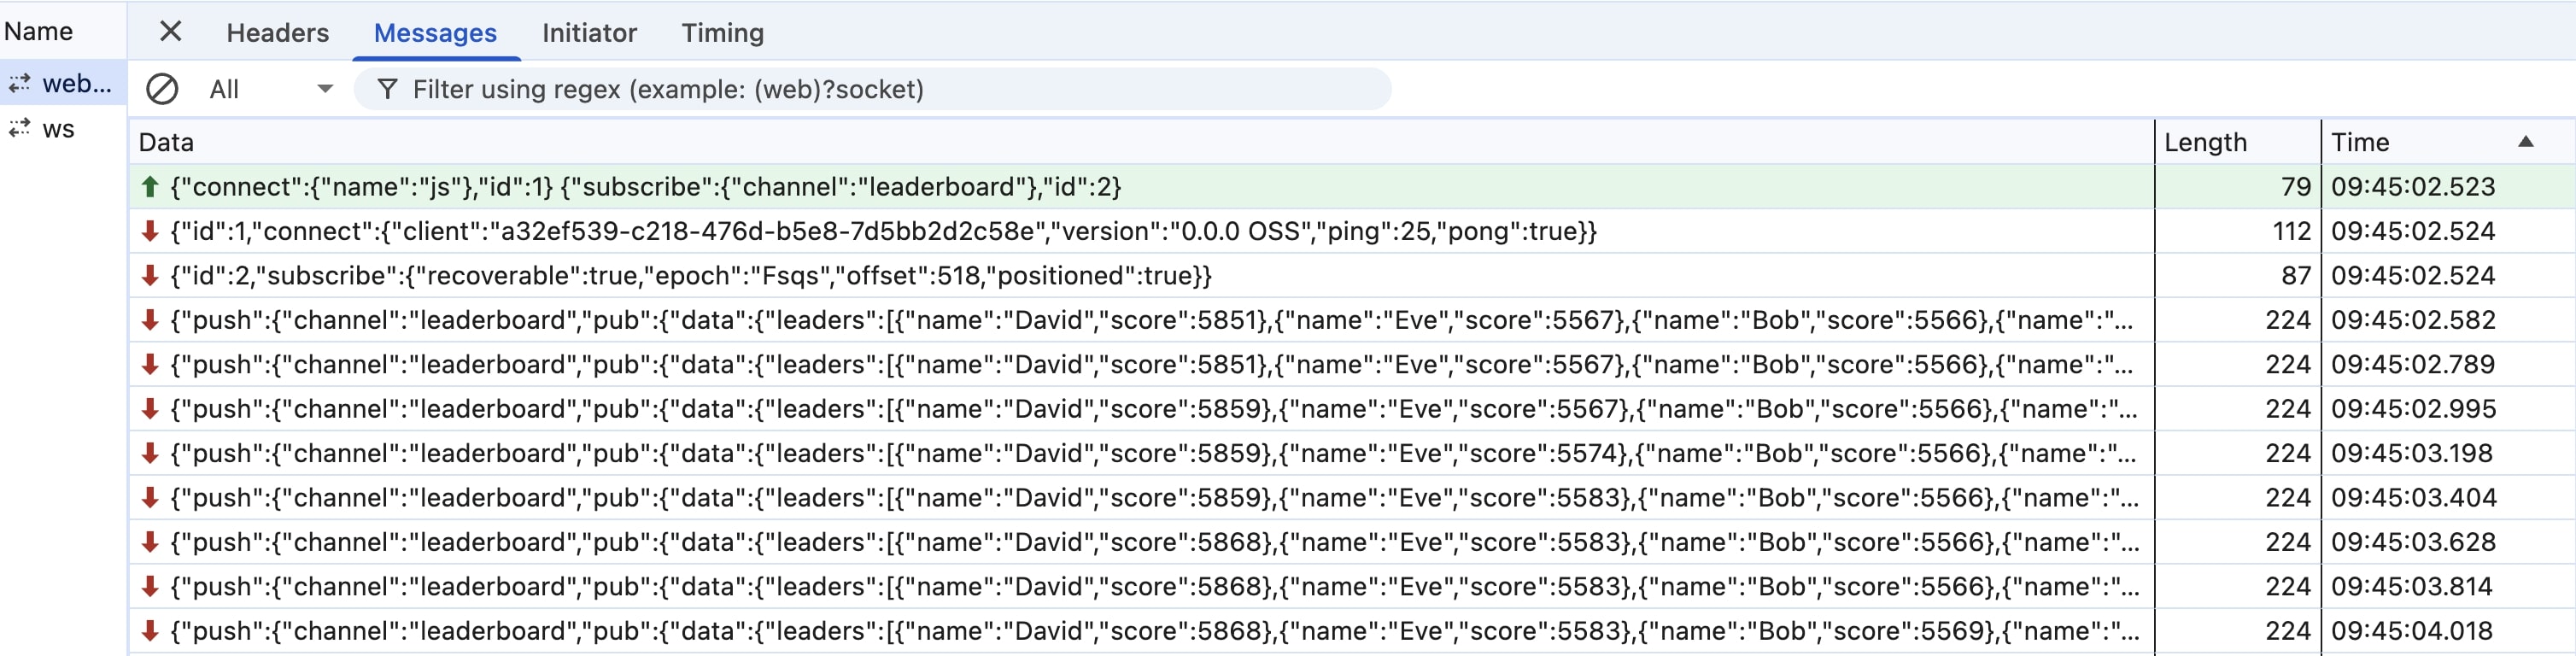
We see the full content is being sent in every message.
Let's add Fossil delta compression. To do this, we need to modify the client-side subscription:
const sub = centrifuge.newSubscription("leaderboard", {
  delta: 'fossil',
});
And extend Centrifugo config:
{
   ...
   "channel": {
      "without_namespace": {
        ...
        "allowed_delta_types": ["fossil"],
        "delta_publish": true
      }
   },
   ...
}
Reload the app, and see how WebSocket frames look now:
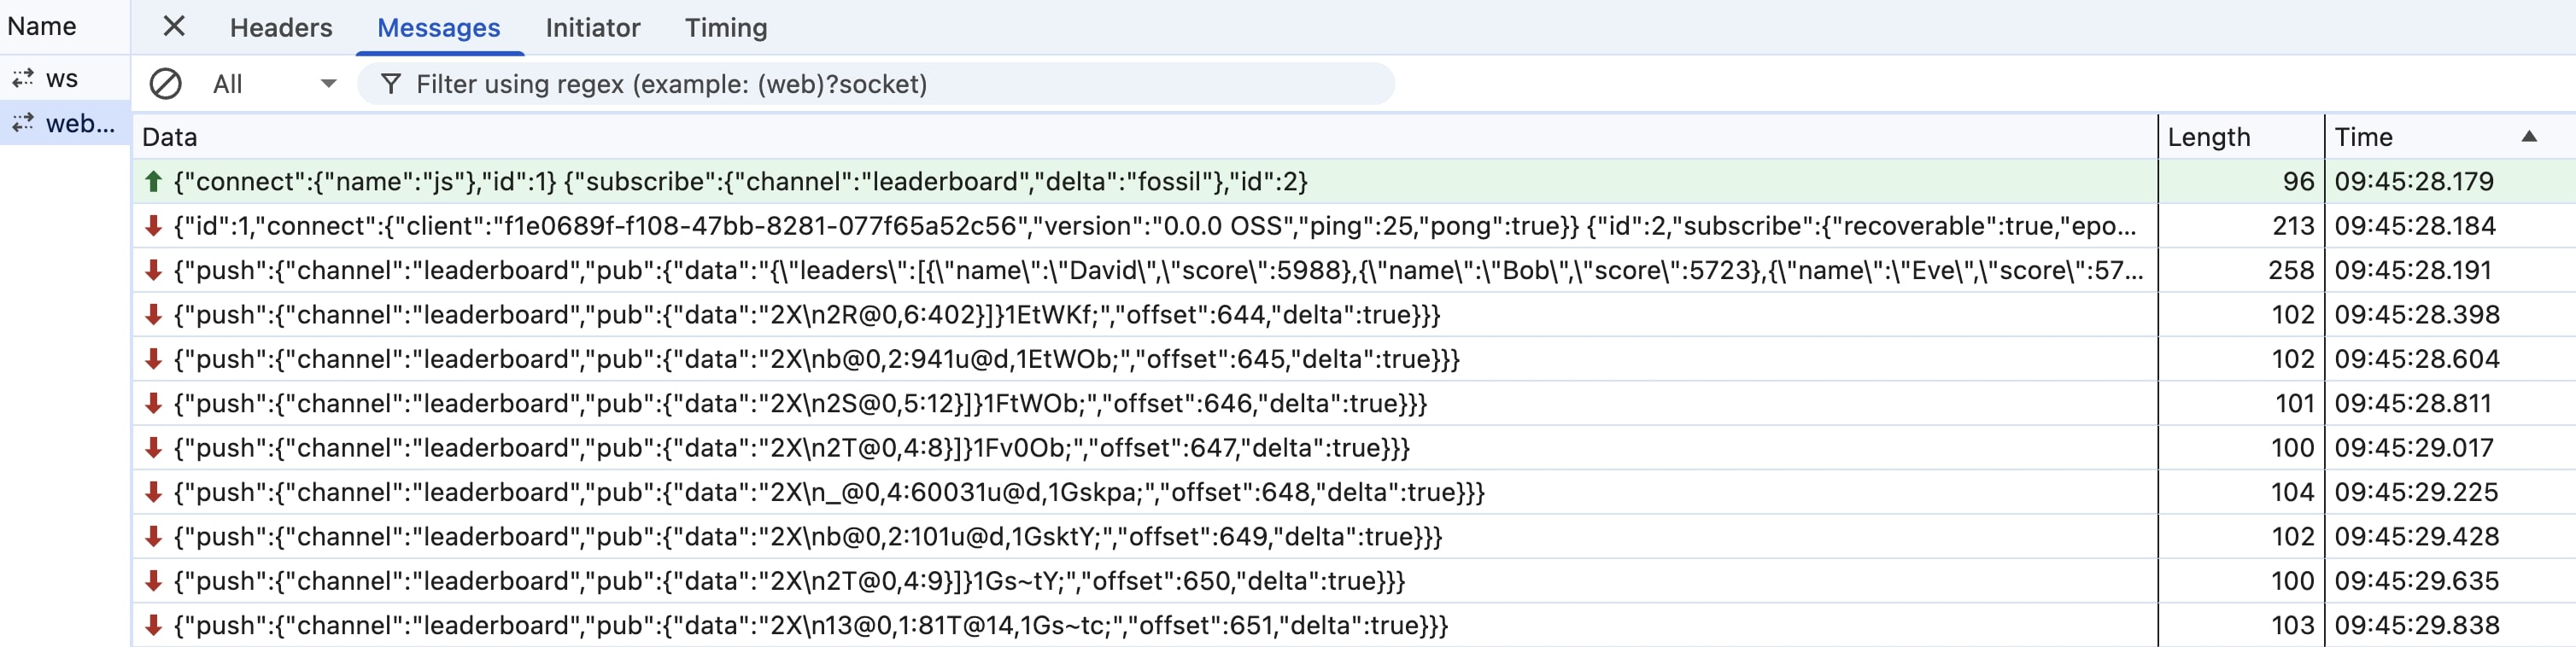
Instead of full payloads, we see deltas with much smaller data size (x2 reduction), and the Centrifugo SDK automatically applies deltas correctly under the hood, so no other changes to the application code are required.
Adding cache recovery mode
Leaderboard data is also a good candidate for Centrifugo cache recovery mode feature. We can instantly and automatically load the latest publication known data upon subscription from Centrifugo stream history.
To do this, we need history to be enabled (we already have) and add a couple of extra options to the configuration:
{
   ...
   "channel": {
      "without_namespace": {
          ...
          "force_recovery": true,
          "force_recovery_mode": "cache"
      }
   },
   ...
}
And one more option (since object) to the client-side subscription to trigger recovery upon the initial subscription:
const sub = centrifuge.newSubscription("leaderboard", {
  delta: 'fossil',
  since: {}
});
After making this, the latest leaderboard data will be immediately displayed to the user upon subscription without the need for extra synchronization of initial state loading and real-time updates.
This is how it looks from the WebSocket frame perspective:
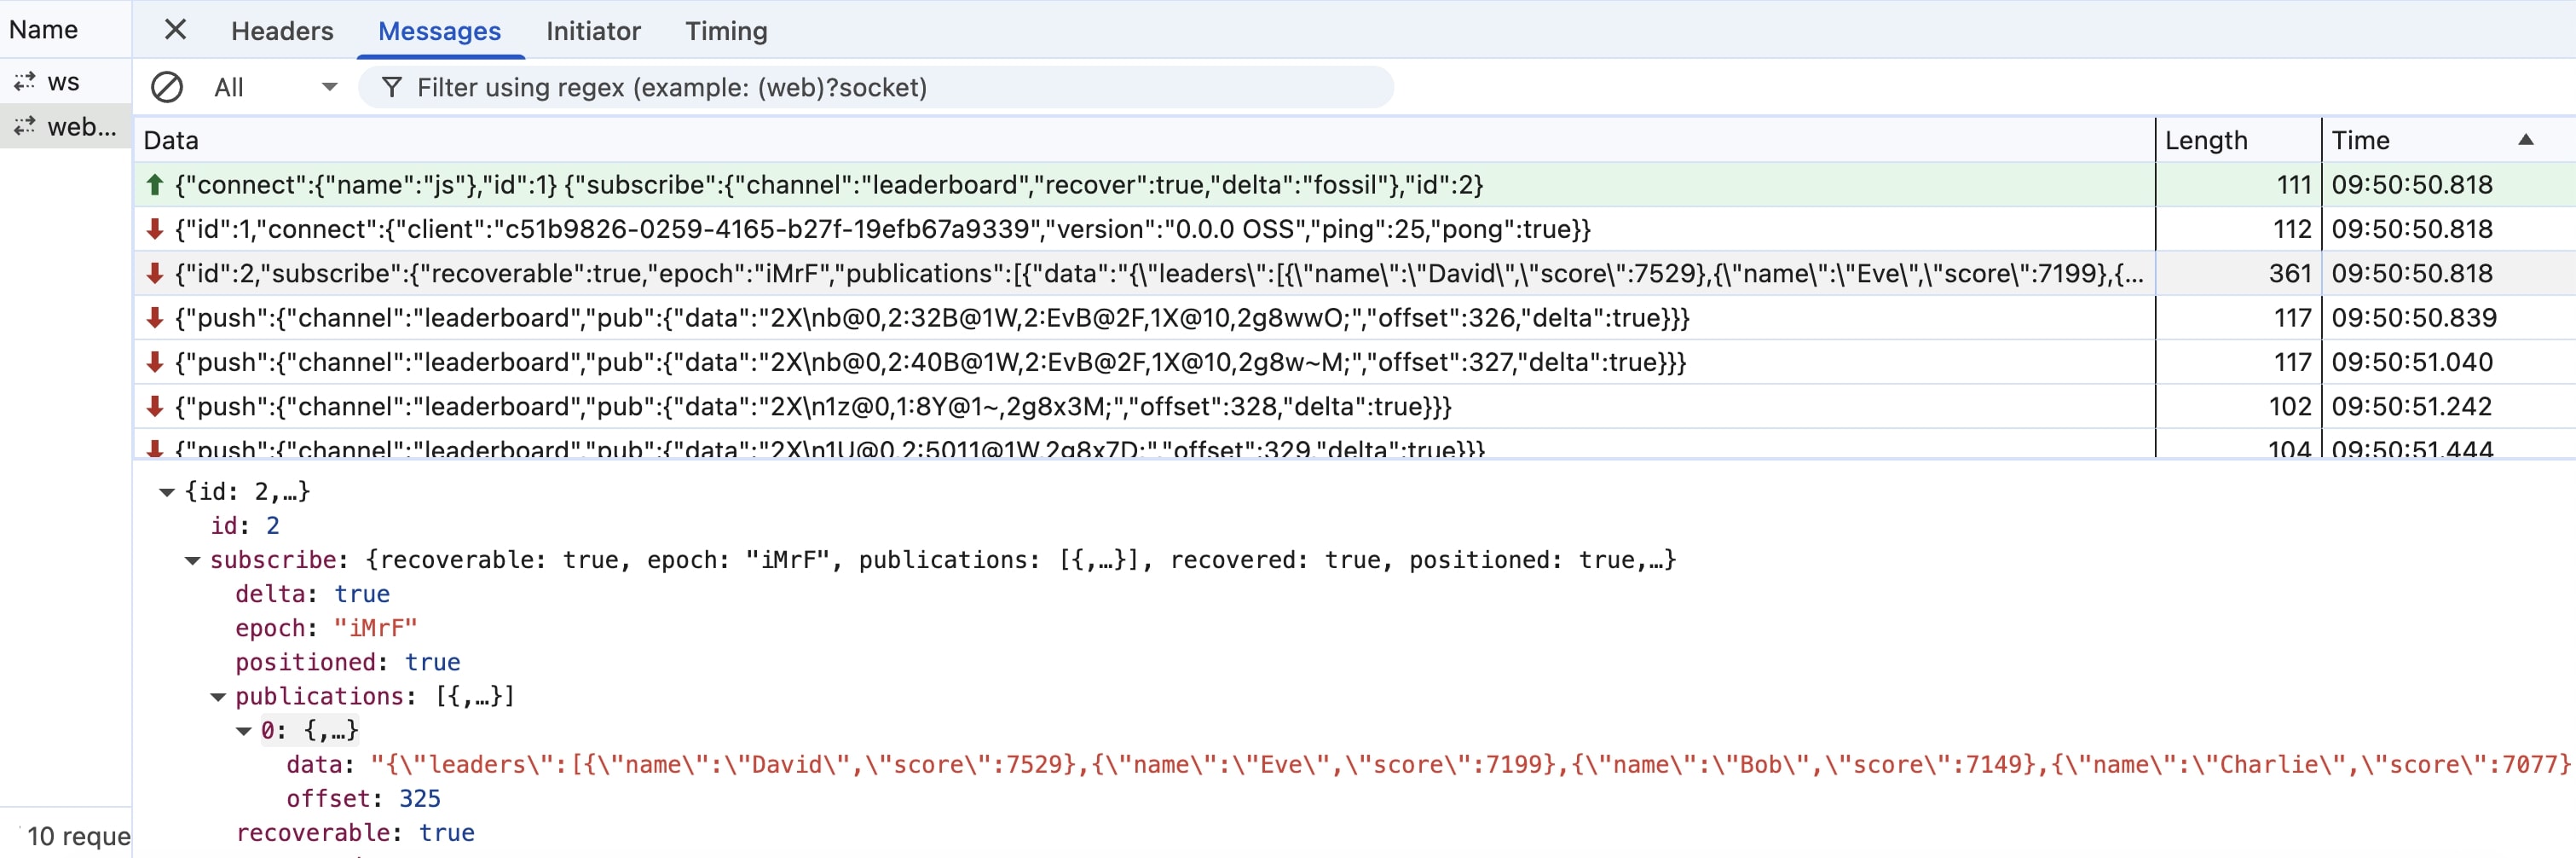
I.e., we see that the initial data was sent within the subscribe response. And it's in JSON string format here because we are using delta compression. If we disable delta compression, we will see the initial data just as a regular JSON object.
Other possible improvements
With Centrifugo, only with a little extra effort you can:
- Add authentication to the WebSocket connection
- Use Centrifugo built-in channel permissions to restrict access to channels
- Use Centrifugo built-in online presence feature to show who is online
- Use binary protocol to reduce the amount of data sent over the network and improve serialization performance
- Provide WebSocket fallbacks based on Server-Sent Events (SSE) or HTTP-streaming
- Scale Centrifugo nodes to handle millions of connections.
Conclusion
In this tutorial, we've built a real-time leaderboard application using Centrifugo, Redis, and React. This demonstrates how Centrifugo can be used to create interactive, real-time applications with minimal effort.
By leveraging the real-time capabilities of Centrifugo, you can create engaging, interactive applications that provide users with immediate feedback and updates.
Moreover, Centrifugo comes with many optimizations to make it the most effective solution for real-time applications. For example, it may use Fossil delta compression to reduce the amount of data sent over the network, and it has a cache recovery mode to ensure that clients can recover from network interruptions without losing updates.