Engines and scalability
In this chapter we talk about central part of each Centrifugo server node – Engine, which consists of two parts – Broker and Presence Manager. These parts provide core functionality and the scalability properties of core Centrifugo channel-related features. For ease of use Centrifugo allows configuring the entire engine as a single entity or to specify Broker and Presence Manager separately for more flexibility.
What is Engine
The Engine in Centrifugo is responsible for:
- publishing messages between nodes, so that in the distributed scenario Centrifugo nodes know about each other
- handle PUB/SUB – i.e. manage channel subscriptions and publications in the distributed case
- keep publication history (in channels where it was configured to be kept)
- save/retrieve online presence information
By default, Centrifugo uses a memory engine – where all the data is kept in Centrifugo process memory. And there is another full-featured Engine implementation – redis – where Centrifugo utilizes Redis (or Redis-compatible storages like AWS Elasticache, Google Memorystore, KeyDB, DragonflyDB, Valkey).
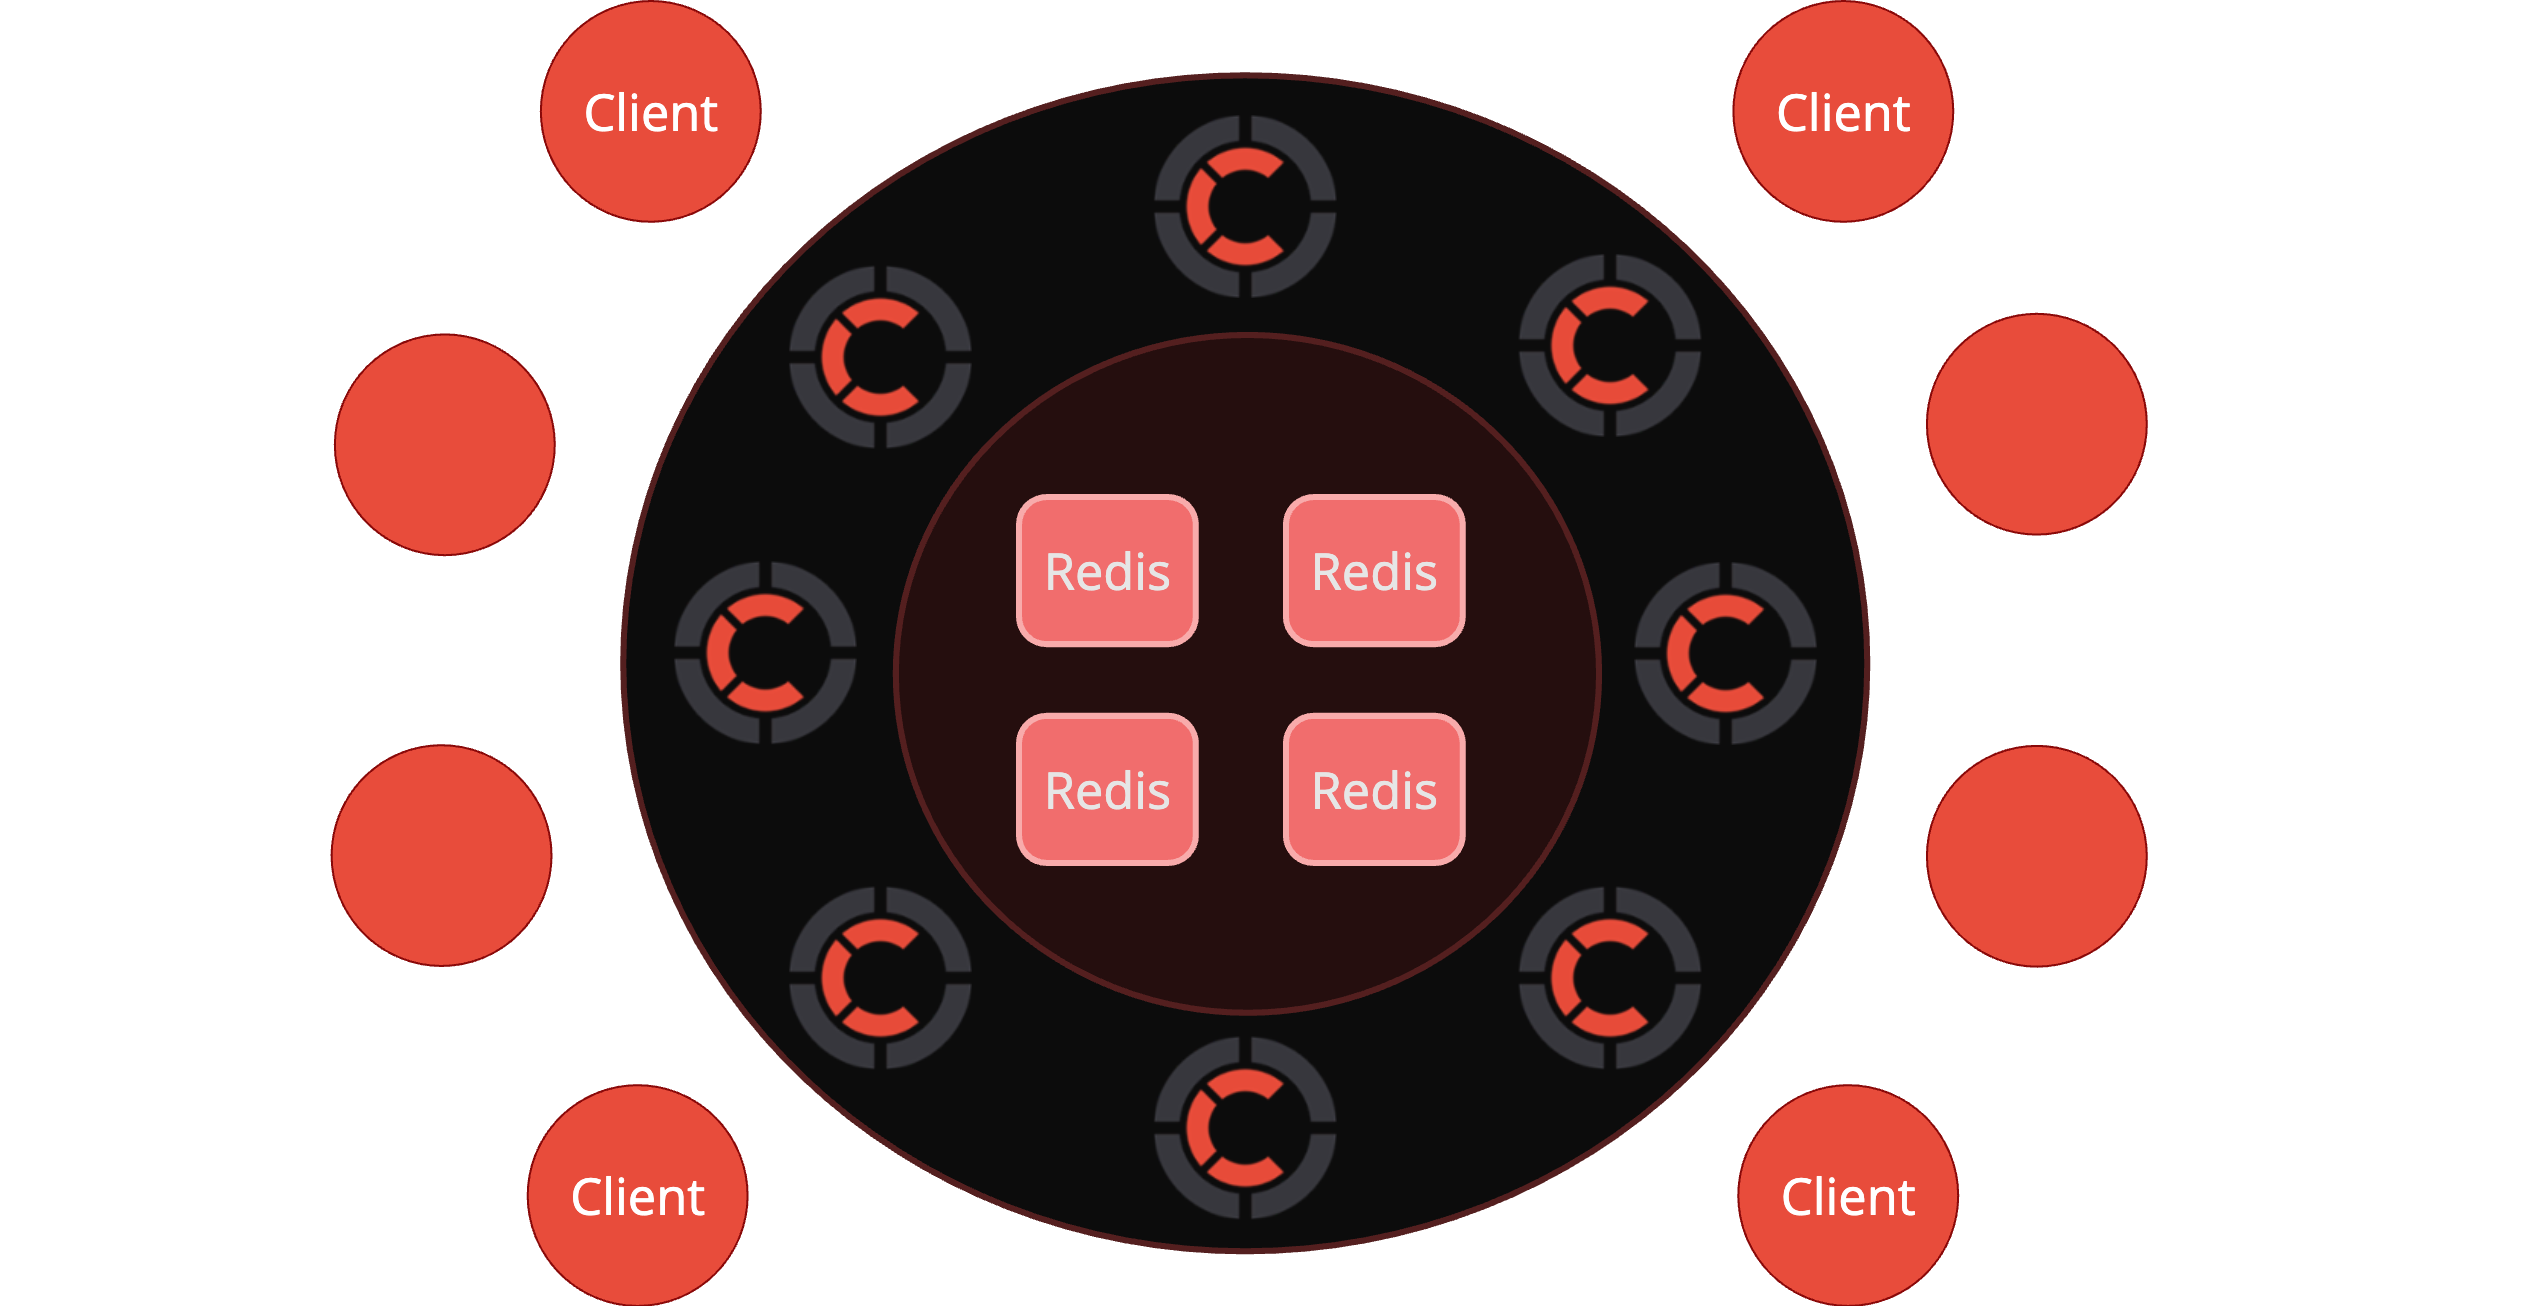
With default memory engine you can start only one node of Centrifugo, while Redis engine allows running several nodes on different machines for high availability and to scale client connections. In distributed case all Centrifugo nodes will be connected via broker PUB/SUB, will discover each other and deliver publications to the node where active channel subscribers exist – so it's possible to publish message to a channel on any node and it will be automatically delivered to subscriber which can be connected to another Centrifugo node.
Memory engine keeps history and presence data in process memory, so the data is lost upon server restart. Given the ephemeral nature of Centrifugo data – the loss may be totally acceptable. When using Redis Engine the data is kept in Redis (where you can configure the desired persistence properties) instead of Centrifugo node process memory, so channel history data won't be lost upon Centrifugo server restart.
engine
The engine section in Centrifugo configuration is a top-level object. It allows configuring the engine used by Centrifugo.
engine.type
String. Default: memory.
Allows setting the type of engine. The default engine type is memory – you don't even need to explicitly configure it.
But to switch to the Redis engine:
{
  "engine": {
    "type": "redis",
    "redis": {}
  }
}
Memory engine
Used by default. Supports only one node. Supports all engine features keeping everything in Centrifugo node process memory.
Advantages:
- Superfast since it does not involve network round trips at all
- Does not require separate broker setup, works out of the box
Trade-offs:
- Does not allow scaling nodes (actually you still can scale Centrifugo with Memory engine in some cases, for example when each connection is isolated and there is no need to deliver messages between nodes)
- Does not persist publication history in channels between Centrifugo restarts.
Redis engine
Redis is an open-source, in-memory data structure store, often used as a lightweight database solution, cache, and message broker.
Centrifugo integrates with it to provide a scalable and highly available real-time messaging solution. When running multiple Centrifugo nodes and pointing them to a Redis installation by configuring the Redis engine, you get a distributed real-time messaging system where Centrifugo nodes form a cluster and communicate with each other over Redis PUB/SUB. In this case, channel history and presence information are stored in Redis.
These days, the engine also supports Redis-compatible storage solutions such as AWS ElastiCache, KeyDB, DragonflyDB, and Valkey (see more information below).
To switch from the in-memory engine to the Redis engine, update your configuration as follows:
{
  "engine": {
    "type": "redis",
    "redis": {}
  }
}
Advantages:
- Scale Centrifugo horizontally by running multiple nodes without worrying about which node a client connects to—everything works seamlessly. You can execute publish API command on any Centrifugo node, and publication will be delivered to all online channel subscribers.
- Message history in channels persists even after Centrifugo node restarts.
Trade-offs:
- Redis requires a separate deployment.
- Network round trips between Centrifugo nodes and Redis introduce some latency.
With Redis it's possible to come to the architecture like this:
Minimal required Redis version is 6.2.0
For a deep dive into how Centrifugo talks to Redis efficiently, shards across isolated Redis instances, and makes PUB/SUB scale on Redis Cluster, see the blog post Scaling Redis Pub/Sub to Millions of Channels and Hundreds of Subscriber Nodes.
engine.redis
Let's describe various options available to configure Redis engine.
engine.redis.address
String or array of strings, default "redis://127.0.0.1:6379".
Redis server address. Using a single address string it's possible to describe standalone Redis, Redis with Sentinel and Redis cluster endpoints. In most cases you will use a single address string here, but see below how passing an array of addresses allows enabling Centrifugo Redis sharding.
{
  "engine": {
    "type": "redis",
    "redis": {
      "address": "127.0.0.1:6379"
    }
  }
}
You can also use an address with redis:// scheme to set Redis address. In that case you can provide additional options. For example to set Redis user and password and custom Redis database number:
{
  "engine": {
    "type": "redis",
    "redis": {
      "address": "redis://user:password@127.0.0.1:6379/0"
    }
  }
}
When you need to connect to Redis with TLS enabled, use rediss:// scheme:
{
  "engine": {
    "type": "redis",
    "redis": {
      "address": "rediss://user:password@127.0.0.1:6379/0"
    }
  }
}
For additional TLS settings see engine.redis.tls.
Note, if you want to use Redis Sentinel or Redis Cluster – then you must use a special scheme for Redis address to explicitly tell Centrifugo the type of Redis setup. See below the details.
engine.redis.prefix
String, default "centrifugo" – custom prefix to use for channels and keys in Redis.
engine.redis.force_resp2
Boolean, default false. If set to true it forces using RESP2 protocol for communicating with Redis. By default, Redis client used by Centrifugo tries to detect supported Redis protocol automatically trying RESP3 first.
engine.redis.history_use_lists
Boolean, default false – turns on using Redis Lists instead of Stream data structure for keeping history (not recommended, keeping this for backwards compatibility mostly).
engine.redis.presence_ttl
Duration, default "60s".
How long presence is considered valid if not confirmed by active client connection.
engine.redis.presence_hash_field_ttl
Boolean, default false.
By default, Centrifugo uses online presence implementation with ZSET to track expiring items. Redis 7.4 introduced a per HASH field TTL. Option presence_hash_field_ttl (under engine.redis) allows configuring Centrifugo to use the feature when storing online presence.
Benefits:
- less memory in Redis for presence information since less data to keep (no need in separate ZSET), up to 1.6x improvement.
- slightly better CPU utilization on Redis side since less keys to deal with in LUA scripts during presence get, add, remove operations.
Since HASH per field TTL is only available in Redis >= 7.4, Centrifugo requires explicit intent to enable its usage.
engine.redis.presence_user_mapping
Boolean, default false.
It's possible to keep user mapping information on Redis side to optimize presence stats API.
It's implemented in a way that Centrifugo maintains additional per-user data structures in Redis. Similar to structures used for general client presence (ZSET + HASH). So we get a possibility to efficiently get both the number of clients in channel and the number of unique users in it.
This may be useful to drastically reduce the time of Redis operation if you call presence stats for channels with large number of active subscribers. In our benchmarks, for a channel with 100k unique subscribers, number of presence stats ops bumped from 15 to 200k per second.
The feature comes with a cost – it increases memory usage in Redis, possibly up to 2x from what was spent on presence information before enabling (less if you use info attached to a client connection, since Centrifugo does not include info payload to user mapping structures).
To enable set the option to true.
engine.redis.tls
Under engine.redis.tls key you can provide unified TLS config for Redis. It allows configuring TLS for Redis client connections.
Scaling with Redis tutorial
Let's see how to start several Centrifugo nodes using the Redis Engine. We will start 3 Centrifugo nodes and all those nodes will be connected via Redis.
First, you should have Redis installed and running. As soon as it's running - we can launch 3 Centrifugo instances. Open your terminal and start the first one:
centrifugo --config=config.json --port=8000 --engine.type=redis
If your Redis is on the same machine and runs on its default port you can omit engine.redis.address option in the command above.
Then open another terminal and start another Centrifugo instance:
centrifugo --config=config.json --port=8001 --engine.type=redis
Note that we use another port number (8001) as port 8000 is already busy by our first Centrifugo instance. If you are starting Centrifugo instances on different machines then you most probably can use
the same port number (8000 or whatever you want) for all instances.
And finally, let's start the third instance:
centrifugo --config=config.json --port=8002 --engine.type=redis
Now you have 3 Centrifugo instances running on ports 8000, 8001, 8002 all connected to Redis on localhost:6379 (default used by Centrifugo) and clients can connect to any of them. You can also send API requests to any of those nodes – as all nodes connected over Redis PUB/SUB message will be delivered to all interested clients on all nodes.
To load balance clients between nodes you can use Nginx – you can find its configuration here in the documentation.
In the production environment you will most probably run Centrifugo nodes on different hosts, so there will be no need to use different port numbers.
Here is a live example where we locally start two Centrifugo nodes both connected to local Redis:
Redis Sentinel for high availability
Centrifugo supports the official way to add high availability to Redis - Redis Sentinel.
To use it you need to pass Redis address in a special format:
redis+sentinel://[[[user]:password]@]host:port?sentinel_master_name=mymaster
Note, explicit redis+sentinel scheme is required.
For example:
{
  "engine": {
    "type": "redis",
    "redis": {
      "address": "redis+sentinel://localhost:26379?sentinel_master_name=mymaster"
    }
  }
}
In case of Redis Sentinel sentinel_master_name address param is required. Host and port becomes Sentinel address. You can provide additional Redis Sentinel addresses using addr param (can be multiple):
{
  "engine": {
    "type": "redis",
    "redis": {
      "address": "redis+sentinel://localhost:26379?sentinel_master_name=mymaster&addr=localhost:26380"
    }
  }
}
To specify Redis Sentinel user and password use sentinel_user and sentinel_password parameters of address:
{
  "engine": {
    "type": "redis",
    "redis": {
      "address": "redis+sentinel://localhost:26379?sentinel_master_name=mymaster&sentinel_user=sentinel&sentinel_password=XXX"
    }
  }
}
To provide custom TLS for Redis Sentinel set sentinel_tls key to the config (which is a unified TLS config object):
{
  "engine": {
    "type": "redis",
    "redis": {
      "address": "redis+sentinel://localhost:26379?sentinel_master_name=mymaster",
      "sentinel_tls": {
        "enabled": true,
        ...
      }
    }
  }
}
Sentinel configuration file may look like this (for 3-node Sentinel setup with quorum 2):
port 26379
sentinel monitor mymaster 127.0.0.1 6379 2
sentinel down-after-milliseconds mymaster 10000
sentinel failover-timeout mymaster 60000
You can find how to properly set up Sentinels in official documentation.
Note that when your Redis master instance is down there will be a small downtime interval until Sentinels discover a problem and come to a quorum decision about a new master. The length of this period depends on Sentinel configuration.
Haproxy instead of Sentinel configuration
Alternatively, you can use Haproxy between Centrifugo and Redis to let it properly balance traffic to Redis master. In this case, you still need to configure Sentinels but you can omit Sentinel specifics from Centrifugo configuration and just use Redis address as in a simple non-HA case.
For example, you can use something like this in Haproxy config:
listen redis
    server redis-01 127.0.0.1:6380 check port 6380 check inter 2s weight 1 inter 2s downinter 5s rise 10 fall 2
    server redis-02 127.0.0.1:6381 check port 6381 check inter 2s weight 1 inter 2s downinter 5s rise 10 fall 2 backup
    bind *:16379
    mode tcp
    option tcpka
    option tcplog
    option tcp-check
    tcp-check send PING\r\n
    tcp-check expect string +PONG
    tcp-check send info\ replication\r\n
    tcp-check expect string role:master
    tcp-check send QUIT\r\n
    tcp-check expect string +OK
    balance roundrobin
And then just point Centrifugo to this Haproxy:
{
  "engine": {
    "type": "redis",
    "redis": {
      "address": "localhost:16379"
    }
  }
}
Redis sharding
Centrifugo has built-in application-level Redis sharding support.
This resolves the situation when Redis becoming a bottleneck on a large Centrifugo setup. Redis is a single-threaded server, it's very fast but its power is not infinite so when your Redis approaches 100% CPU usage then the sharding feature can help your application to scale.
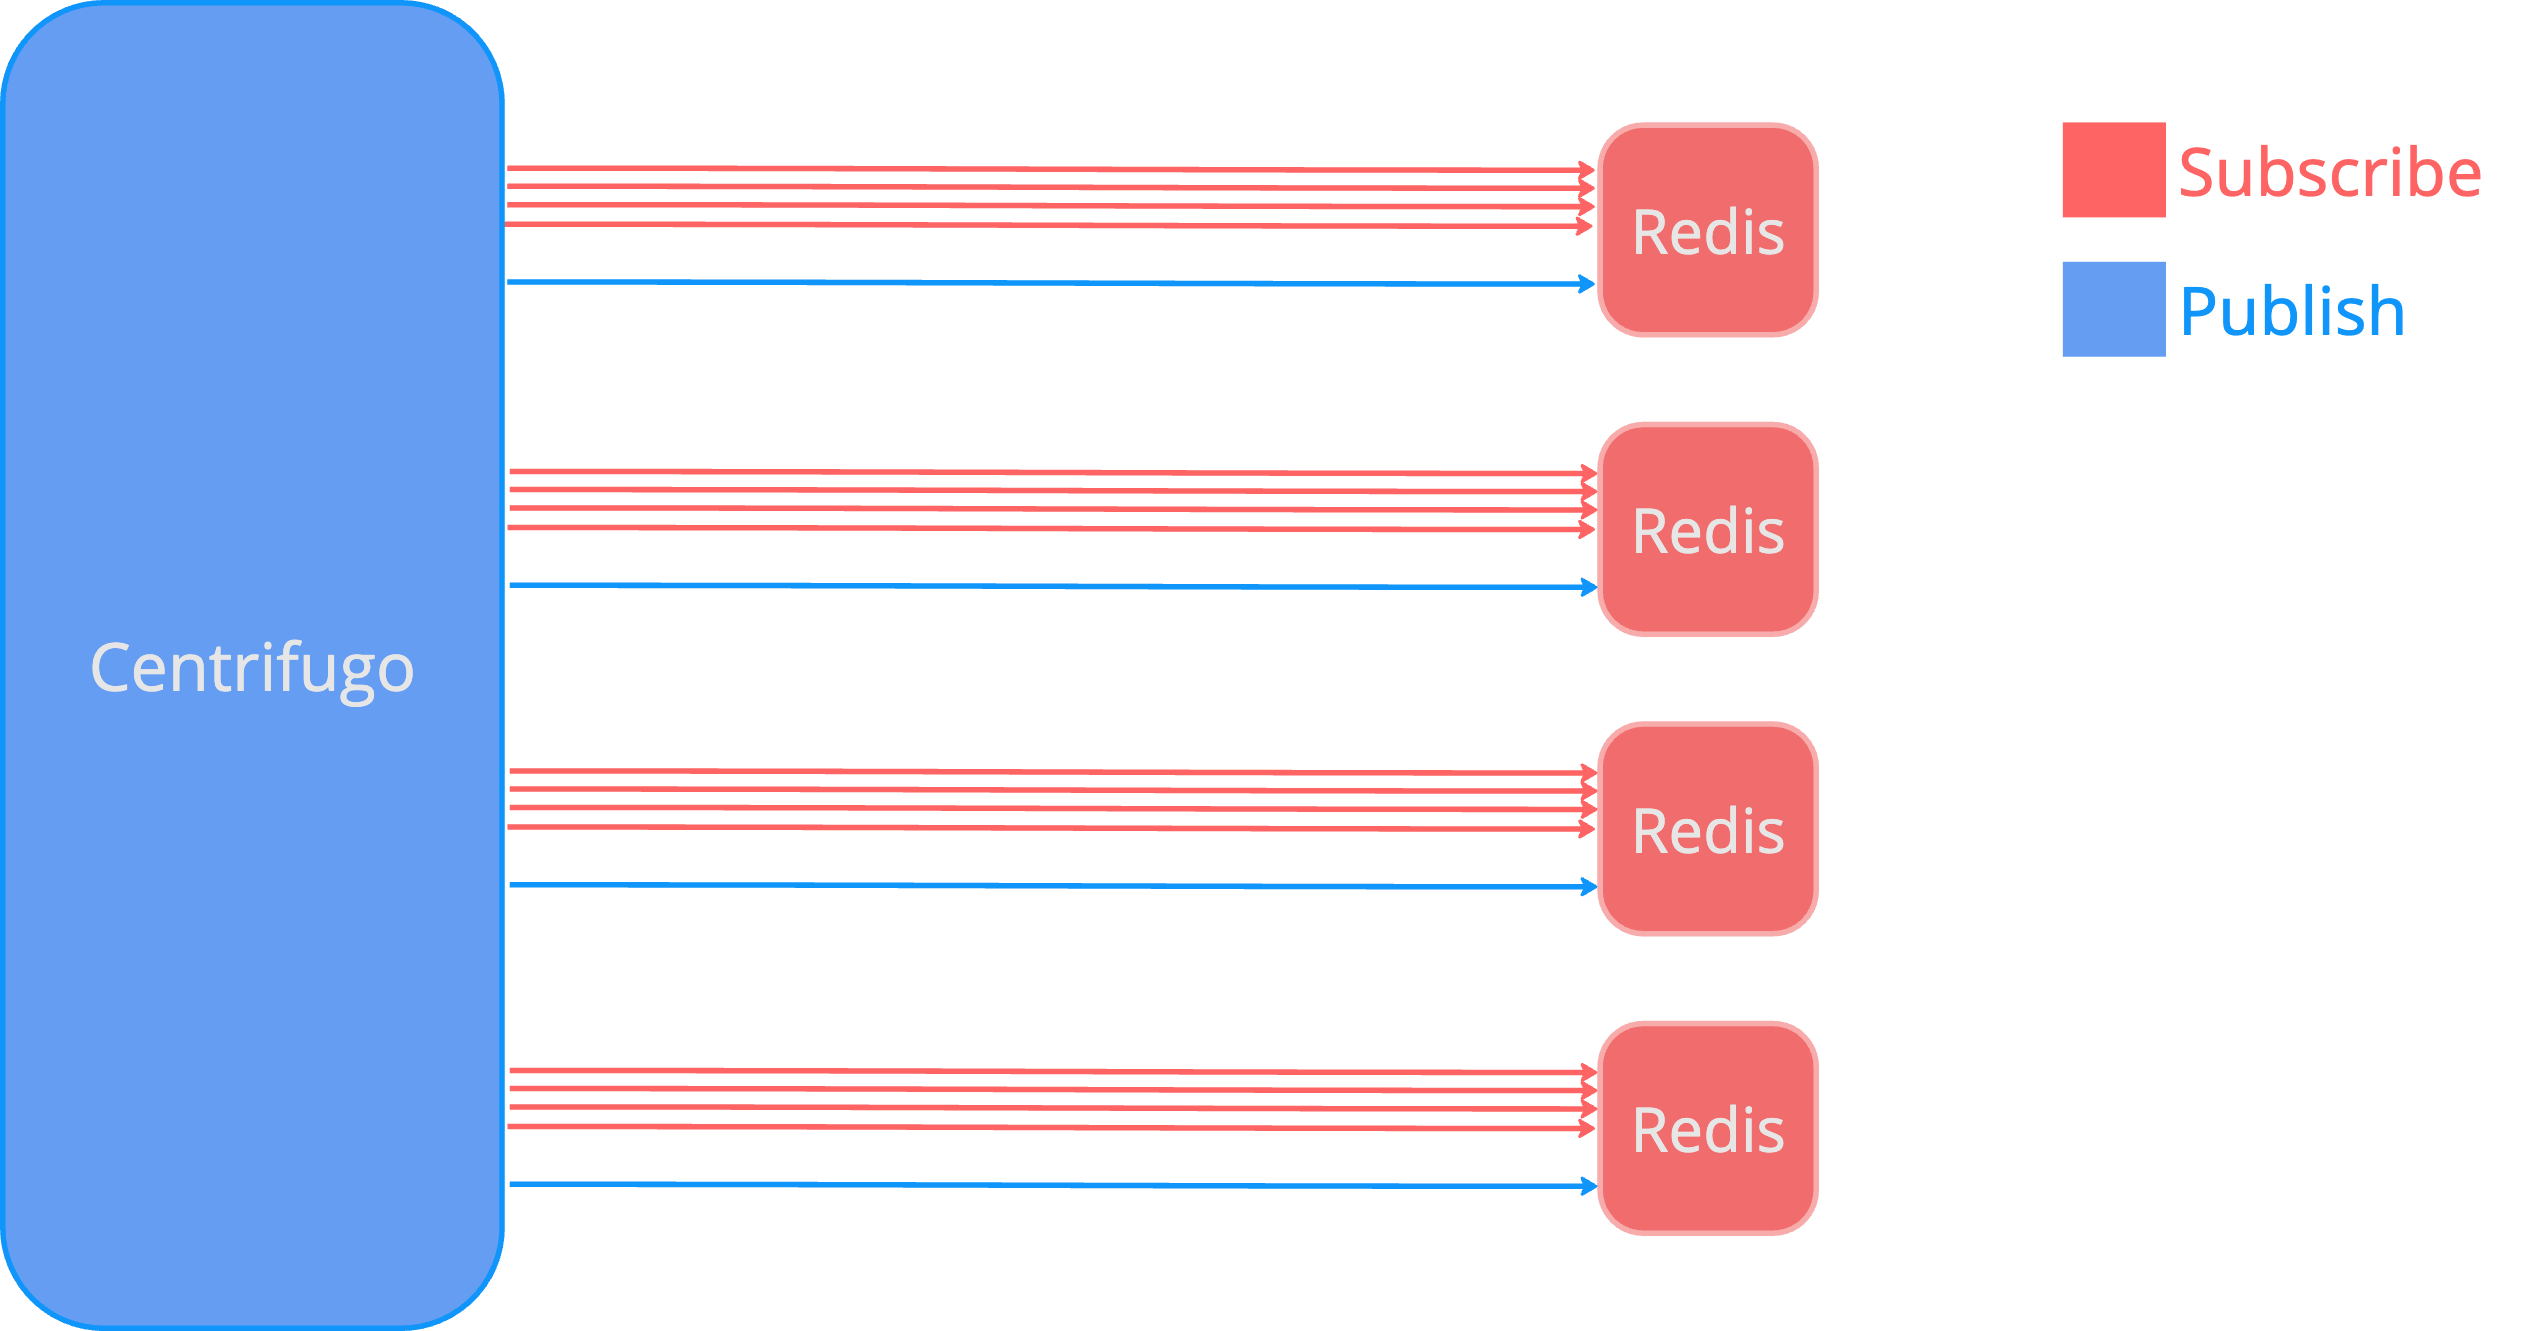
At the moment Centrifugo supports a simple comma-based approach to configuring Redis shards. Let's just look at examples.
To start Centrifugo with 2 Redis shards use config like this:
{
  "engine": {
    "type": "redis",
    "redis": {
      "address": [
        "127.0.0.1:6379",
        "127.0.0.1:6380"
      ]
    }
  }
}
If you also need to customize AUTH password, Redis DB number then you can use an extended address notation.
Due to how Redis PUB/SUB works you must not (and it's pretty useless anyway) to run different shards in one Redis instance using different Redis DB numbers.
When sharding enabled Centrifugo will spread channels and history/presence keys over configured Redis instances using a consistent hashing algorithm. At the moment we use Jump consistent hash algorithm (see paper and implementation).
Redis Cluster support
Centrifugo supports Redis Cluster also. In the Redis Cluster case Centrifugo starts generating keys using hash tags to take care about distributed slot logic. Redis Cluster is detected automatically by Centrifugo.
This means that you can just use Redis Cluster address in the same way as you would use a single Redis instance address pointing Centrifugo to Redis Cluster node:
{
  "engine": {
    "type": "redis",
    "redis": {
      "address": "redis://127.0.0.1:6380"
    }
  }
}
It's possible to provide more Redis Cluster seed nodes using addr param of Redis URL (redis://127.0.0.1:6380?addr=127.0.0.1:6381&addr=127.0.0.1:6382)
If you need to shard data (using app-level sharding) between several Redis clusters:
{
    ...
    "address": [
        "redis://127.0.0.1:7000",
        "redis://127.0.0.1:8000"
    ]
}
Sharding between different Redis clusters can make sense due to the fact how PUB/SUB works in the Redis cluster. It does not scale linearly when adding nodes as all PUB/SUB messages got copied to every cluster node. See this discussion for more information on topic. To spread data between different Redis clusters Centrifugo uses the same consistent hashing algorithm described above (i.e. Jump).
Centrifugo PRO supports Redis Cluster sharded PUB/SUB and allows utilizing Redis replicas in Cluster setup.
Redis compatible storages
When using Redis engine it's possible to point Centrifugo not only to Redis itself, but also to the other Redis compatible server. Such servers may work just fine if implement Redis protocol and support all the data structures Centrifugo uses and have PUB/SUB implemented.
Some known options:
- AWS Elasticache – it was reported to work, but we suggest you testing the setup including failover tests and the work under load.
- Google Memorystore – was also reported to work, we also suggest you testing the setup including failover tests and the work under load.
- KeyDB – should work fine with Centrifugo, no known problems at this point regarding Centrifugo compatibility.
- DragonflyDB - should work fine (if you experience issues with it try enabling
engine.redis.force_resp2option). We have not tested a Redis Cluster emulation mode provided by DragonflyDB yet. We suggest you testing the setup including failover tests and work under load. - Valkey – should work fine since it's based on Redis v7, but no tests were performed by Centrifugal Labs.
Separate broker and presence manager
Above we described two full-feature engines available in Centrifugo. But as we mentioned engine in Centrifugo is internally consists of two isolated parts:
- Broker – responsible for PUB/SUB (inter-node communication, channel subscriptions and publications) and channel publication history
- Presence Manager – responsible for online presence information get/add/remove functionality
By allowing to specify broker and presence manager separately, Centrifugo provides more flexibility to users in regards to how they want to scale their Centrifugo setup. For example, it's possible to use Nats broker for PUB/SUB and Redis for presence information. Or it's possible to specify two different Redis setups – one for a Broker part and another one for presence management, just to spread the load, or to utilize the most efficient and scalable Redis setup for broker and presence management.
Centrifugo PRO makes one more step here by allowing to specify custom Broker and Presence Manager on channel namespace level.
broker
broker.enabled
To set a separate broker use config like this:
{
  "broker": {
    "enabled": true,
    "type": "redis"
  }
}
broker.type
Allowed options for broker.type are redis, nats, and postgres.
broker.redis
Object.
For Redis broker implementation Centrifugo basically re-uses the same configuration options as described above as part of Redis engine description. Nats broker is a bit special and comes with its own properties and limitations, we will describe it below.
{
  "broker": {
    "enabled": true,
    "type": "redis",
    "redis": {
      "address": "redis://..."
    }
  }
}
broker.postgres
Object. See the PostgreSQL broker section below for full configuration and usage details.
presence_manager
presence_manager.enabled
To set a separate presence manager use config like this:
{
  "presence_manager": {
    "enabled": true,
    "type": "redis"
  }
}
presence_manager.type defaults to memory and may be set to redis (the only alternative full implementation at this point).
presence_manager.redis
Object.
For Redis presence manager implementation Centrifugo basically re-uses the same configuration options as described above as part of Redis engine description.
Example: separate Redis for broker and presence manager
{
  "broker": {
    "enabled": true,
    "type": "redis",
    "redis": {
      "address": "127.0.0.1:6379"
    }
  },
  "presence_manager": {
    "enabled": true,
    "type": "redis",
    "redis": {
      "address": "127.0.0.1:6380"
    }
  }
}
Nats broker
Nats is a high-performance messaging server. Among many other features it provides a very efficient PUB/SUB. Centrifugo can use it for a Broker part. Nats integration comes with limitations:
- Nats integration works only for unreliable at most once PUB/SUB. This means that history and message recovery Centrifugo features won't be available. Centrifugo does not integrate with Nats JetStream due to a different stream model.
- Nats wildcard channel subscriptions with symbols
*and>are not supported (until explicitly on using nats_allow_wildcards option).
Nats broker quickstart
First, start Nats server:
$ nats-server
[3569] 2020/07/08 20:28:44.324269 [INF] Starting nats-server version 2.1.7
[3569] 2020/07/08 20:28:44.324400 [INF] Git commit [not set]
[3569] 2020/07/08 20:28:44.325600 [INF] Listening for client connections on 0.0.0.0:4222
[3569] 2020/07/08 20:28:44.325612 [INF] Server id is NDAM7GEHUXAKS5SGMA3QE6ZSO4IQUJP6EL3G2E2LJYREVMAMIOBE7JT4
[3569] 2020/07/08 20:28:44.325617 [INF] Server is ready
Then start Centrifugo with a separate nats broker:
{
  "broker": {
    "enabled": true,
    "type": "nats"
  }
}
Run Centrifugo:
centrifugo --config=config.json
And one more Centrifugo on another port (of course in real life you will start another Centrifugo on another machine):
centrifugo --config=config.json --port=8001
Now you can scale connections over Centrifugo instances, instances will be connected over Nats server.
broker.nats
Under the broker.nats section you can specify options specific to Nats.
broker.nats.url
String, default nats://localhost:4222.
Connection url in format nats://derek:pass@localhost:4222.
broker.nats.prefix
String, default centrifugo.
Prefix for channels used by Centrifugo inside Nats.
broker.nats.dial_timeout
Duration, default 1s.
Timeout for dialing with Nats.
broker.nats.write_timeout
Duration, default 1s.
Write (and flush) timeout for a connection to Nats.
broker.nats.tls
TLS object - allows configuring Nats client TLS.
broker.nats.allow_wildcards
Boolean, default false. When on – Centrifugo allows subscribing to wildcard Nats subjects (containing * and > symbols). This way client can receive messages from many channels while only having a single subscription.
Centrifugo join/leave feature won't work for wildcard channels because raw format does not allow Centrifugo to use its own message format for join/leave events.
Be careful with permission management in this case – wildcards allow subscribing to all channels matching a pattern, so you need to carefully design and check channel permissions in this case.
Nats raw mode
Nats raw mode when on tells Centrifugo to consume core Nats topics and not expecting any Centrifugo internal message wrapping. I.e. it allows direct mapping of Centrifugo channels to Nats topics. Your clients will simply get the raw payload Centrifugo consumed from Nats. Also note, that nats_prefix is not used when raw mode is on, if you still need some – there is an option to set prefix inside nats_raw_mode configuration option.
When using Nats raw mode join/leave feature of Centrifugo can't be used.
Here is how raw mode may be enabled:
{
  "broker": {
    "enabled": true,
    "type": "nats",
    "nats": {
      "raw_mode": {
        "enabled": true,
        "channel_replacements": {
          ":": "."
        },
        "prefix": ""
      }
    }
  }
}
channel_replacements is a map[string]string option which allows transforming Centrifugo channel to Nats channel before subscribing and back when consuming a message from Nats. For example, in the example above we can see channel_replacements set in a way to transform chat:index Centrifugo channel to chat.index Nats topic upon subscription. Centrifugo simply replaces all occurrences of symbols in channel_replacements map to corresponding values.
If you publish to Centrifugo API with raw mode enabled – publication payloads will be simply published to Nats subject without any Centrifugo-specific wrapping too.
Centrifugo PRO per-namespace engines feature provides a way to use Nats raw mode only for specific channel namespace.
broker.nats.raw_mode.enabled
Boolean, default false.
Enables using Nats raw mode.
broker.nats.raw_mode.channel_replacements
Map with string keys and string values, default {}.
Allows transforming Centrifugo channel to Nats channel before subscribing and back when consuming a message from Nats.
broker.nats.raw_mode.prefix
String, default "".
Prefix for channels used by Centrifugo inside Nats when raw mode is on. In raw mode Centrifugo does not use default broker.nats.prefix option to be as raw as possible by default (i.e. to translate channels 1 to 1).
PostgreSQL broker
The PostgreSQL broker for stream subscriptions is experimental. The API, configuration options, and SQL function signatures may change based on feedback. Use it in development and staging environments; production use should be accompanied by thorough testing of your specific workload.
The PostgreSQL broker implements the Broker interface for stream subscriptions using PostgreSQL as the backing store. It provides transactional publishing — your application can publish real-time updates inside the same database transaction as your business writes, eliminating the dual-write problem. This is the same transactional-publishing capability that the PostgreSQL map broker provides for map subscriptions, now extended to stream subscriptions.
Key characteristics:
- History and recovery — fully supported. Publications are stored in a partitioned PostgreSQL table and delivered to subscribers via an outbox worker
- Transactional publishing — call
cf_stream_publish()inside yourBEGIN/COMMITto publish atomically with your business writes - No Redis dependency — PostgreSQL handles both persistence and real-time delivery
- Automatic partitioning — the stream table is partitioned by day with automatic lookahead creation and retention-based cleanup (vacuum-free
DROP TABLE)
Requires PostgreSQL 16 or later.
When to use the PostgreSQL broker instead of Redis:
- Your publications correspond to database writes (notifications, audit logs, order updates) and you want them atomic with your transaction
- You want to eliminate Redis as a dependency and use PostgreSQL as the only infrastructure
- Your throughput is in the low thousands of publishes per second per broker (for higher throughput without transactional guarantees, use Redis)
PostgreSQL broker quickstart
Start Centrifugo with the PostgreSQL broker:
{
  "broker": {
    "enabled": true,
    "type": "postgres",
    "postgres": {
      "dsn": "postgres://user:pass@localhost:5432/app?sslmode=disable",
      "use_notify": true
    }
  }
}
Centrifugo automatically creates the required tables and SQL functions on startup.
Transactional publishing
Your application can call cf_stream_publish inside its own transactions:
BEGIN;
  -- Business logic
  INSERT INTO notifications (user_id, message)
  VALUES (42, 'Your order has shipped');

  -- Publish to real-time channel (same transaction)
  SELECT * FROM cf_stream_publish(
    p_channel := 'notifications:user_42',
    p_data    := '{"message": "Your order has shipped"}'::jsonb
  );
COMMIT;
If the transaction rolls back, the real-time update never happened. The outbox architecture is the same as the PostgreSQL map broker — per-shard workers poll the stream table, coordinate via shard locks, and wake via LISTEN/NOTIFY.
broker.postgres
Configuration options for the PostgreSQL broker:
broker.postgres.dsn
String, required. PostgreSQL connection string.
Example: "postgres://user:pass@localhost:5432/app?sslmode=disable"
broker.postgres.pool_size
Integer, default 16. Maximum number of connections in the primary pool.
broker.postgres.num_shards
Integer, default 8. Number of delivery worker shards. Channels are distributed across shards via consistent hashing.
broker.postgres.cleanup_interval
Duration, default "1m". How often the cleanup and partition workers tick.
broker.postgres.idempotent_result_ttl
Duration, default "5m". TTL for idempotency cache entries.
broker.postgres.binary_data
Boolean, default false. Use BYTEA columns instead of JSONB for data fields. Set to true if your payloads are not valid JSON (e.g. Protobuf).
broker.postgres.table_prefix
String, default "cf". Namespace prefix for all table and function names. The broker appends _stream_ (or _binary_stream_ when binary_data is true) internally, so the default produces cf_stream_* tables and cf_stream_publish(...) functions. Use distinct prefixes for multi-tenant deployments sharing one PostgreSQL instance (e.g. "prod_us_cf", "prod_eu_cf").
broker.postgres.stream_retention
Duration, default "24h". Safety floor for HistoryMetaTTL when neither publish options nor node config sets it. Guarantees every channel meta row eventually expires.
broker.postgres.use_notify
Boolean, default false. Enable PostgreSQL LISTEN/NOTIFY for low-latency outbox wakeup. When false, the outbox worker polls on outbox.poll_interval (default 100ms). When true, delivery latency drops to low single-digit milliseconds.
LISTEN/NOTIFY requires a persistent, dedicated connection to PostgreSQL. PGBouncer in transaction pooling mode (the most common setup) is incompatible with it — the pooler may route the LISTEN command and subsequent notifications to different backend connections. Other poolers with similar limitations: RDS Proxy (not supported at all), PgCat. Supavisor and PgBouncer 1.21+ (with experimental listen_notify option) do support it.
When dsn points at an incompatible pooler, set notify_dsn to a direct PostgreSQL URL. Centrifugo will use that DSN exclusively for the single LISTEN connection while the main pool continues to go through the pooler. Alternatively, set use_notify: false and rely on polling.
broker.postgres.notify_dsn
String, default "". Optional separate DSN used exclusively for the LISTEN connection when use_notify is true. Set this to a direct PostgreSQL URL (bypassing PGBouncer or other poolers) when dsn points at a connection pooler that is incompatible with LISTEN/NOTIFY. If empty, the primary DSN pool is used.
broker.postgres.skip_schema_init
Boolean, default false. Skip automatic schema creation on startup. When true, the schema must be managed externally.
broker.postgres.partition_lookahead_days
Integer, default 2. Number of future daily partitions to pre-create. Must be > 0 to avoid write failures at the day boundary. A value of 2 gives a 48-hour safety window if the lookahead worker stalls.
broker.postgres.partition_retention_days
Integer, default 7. Partitions older than this are dropped automatically via DROP TABLE — instant, vacuum-free cleanup. Set to 0 for unlimited retention (old partitions accumulate but can be dropped manually).
broker.postgres.outbox.poll_interval
Duration, default "100ms". How often to poll for new history rows when idle.
broker.postgres.outbox.batch_size
Integer, default 1000. Maximum number of rows to process per outbox batch.
PostgreSQL broker SQL functions
Centrifugo creates these SQL functions when the schema is initialized:
| Function | Purpose |
|---|---|
cf_stream_publish(...) | Atomic publish: shard lock → meta UPSERT → history INSERT → NOTIFY |
cf_stream_publish_strict(...) | Same as publish, but raises an exception on suppression |
cf_stream_publish_join(...) | Insert a join event (kind=1) |
cf_stream_publish_leave(...) | Insert a leave event (kind=2) |
cf_stream_remove_history(...) | Remove all publications for a channel |
cf_stream_top_position(...) | Get current stream position (offset + epoch) for the external-state pattern |
When a custom table_prefix is configured, all table and function names use that prefix instead of the default cf — for example, myapp_stream_publish(...), myapp_stream_history, etc. When binary_data is enabled, the _binary_stream_ variant is used (e.g. cf_binary_stream_publish).
The publish function supports version-based suppression (via p_version and p_version_epoch parameters) and idempotency (via p_idempotency_key). See the transactional publishing blog post for examples.
Differences from the Redis broker
Unlike the Redis broker, the PostgreSQL broker always tracks stream position (offset and epoch) for every publication — even when HistoryTTL and HistorySize are not configured on the channel. This is because the PG broker's live delivery mechanism is the stream table itself: the outbox worker polls it for new rows. Every publish must write to the stream table and increment the offset, otherwise live delivery wouldn't work.
In contrast, the Redis broker uses separate PUB/SUB and Stream mechanisms. When HistoryTTL/HistorySize are not set, Redis publishes via PUB/SUB only (fire-and-forget, no offset tracking). With the PG broker, this distinction doesn't exist — the stream table serves both live delivery and history.
Other differences to be aware of:
- Meta TTL not refreshed on reads. The Redis and Memory brokers refresh the channel metadata TTL when
History()is called — so a channel with active readers but no publishers stays alive. The PostgreSQL broker does not: meta TTL is only set/refreshed on publish. A channel that stops receiving publishes will eventually have its meta expire, even if clients are still reading history. - Polling-based delivery, not PUB/SUB. Each Centrifugo node polls the PostgreSQL stream table independently. With N nodes, that's N× the read load on PostgreSQL. The Redis broker uses native PUB/SUB where the message is delivered once and fanned out. For multi-node PG setups, Centrifugo PRO's broker fan-out reduces this to one poller per shard.
- Partition-based cleanup. Data is cleaned up by dropping entire daily partitions (controlled by
partition_retention_days), not per-channel TTL. Individual publications can't expire independently — the whole partition is dropped or retained. Alignpartition_retention_dayswith your longest channelhistory_ttlto control storage. p_history_ttlshould not exceedpartition_retention_days— once a partition is dropped, the rows are gone regardless of the TTL. For example, with the defaultpartition_retention_days: 7, settinghistory_ttlto 30 days would promise more history than the partitions retain.
When calling SQL functions directly:
cf_stream_publish(p_channel, p_data)withoutp_history_ttl/p_history_sizeuses built-in defaults (history_ttl = 1 minute,history_size = 100). These defaults ensure History() and recovery work correctly out of the box. When publishing via the Centrifugo API, channel namespace config values override these defaults automatically.- You can pass
p_history_ttlandp_history_sizeexplicitly to override the defaults. Values are preserved across publishes viaCOALESCE— once set on a channel, subsequent publishes without these parameters keep the existing values.
PostgreSQL broker scaling
Centrifugo PRO extends the PostgreSQL stream broker with the same scaling features available for the PostgreSQL map broker:
- Read replicas — distributes read load across PostgreSQL replicas
- Broker fan-out — only one node per shard polls PostgreSQL, then publishes updates through Redis or NATS. Reduces PostgreSQL load proportionally to cluster size
Configuration follows the same pattern — see the PostgreSQL map broker PRO docs for examples.
In Centrifugo OSS, the broker setting is global — all channels use the same backend. If you already run Redis and want to use the PostgreSQL broker for specific channels (e.g. order updates that benefit from transactional publishing), Centrifugo PRO's per-namespace engines let you assign the PostgreSQL broker to individual namespaces while keeping Redis as the default for everything else.
PostgreSQL controller
The PostgreSQL controller is experimental. We appreciate early feedback but the API may change.
The Controller in Centrifugo is responsible for cross-node communication in the cluster — heartbeats, node discovery, surveys, and propagation of unsubscribe/disconnect commands. With the Redis or Nats engine, controller traffic flows over the same backend as the broker. The PostgreSQL controller is a standalone implementation that lets a multi-node Centrifugo cluster coordinate over PostgreSQL without requiring Redis or Nats.
Combined with the PostgreSQL stream broker and/or the PostgreSQL map broker, this completes the "Centrifugo + PostgreSQL, no Redis" story for multi-node deployments — a fully functional cluster running on PostgreSQL alone.
The controller uses the same outbox-based approach as the PostgreSQL broker: control messages are INSERT-ed into a partitioned table with daily retention, and each node polls for new rows. LISTEN/NOTIFY provides low-latency wakeup so messages are typically delivered within a few milliseconds.
Requires PostgreSQL 16 or later.
{
  "controller": {
    "enabled": true,
    "type": "postgres",
    "postgres": {
      "dsn": "postgres://user:password@localhost:5432/centrifugo?sslmode=disable",
      "use_notify": true
    }
  }
}
Centrifugo automatically manages the required database schema (tables, functions, partitions) on startup.
Configuration options
| Option | Type | Default | Description |
|---|---|---|---|
dsn | string | — | PostgreSQL connection string (required) |
pool_size | int | 8 | Maximum connections in the primary pool |
num_shards | int | 1 | Number of shards for serialized publishing |
table_prefix | string | "cf" | Namespace prefix for table names (e.g. cf_controller_messages) |
poll_interval | duration | "50ms" | Idle poll interval for the outbox worker |
use_notify | bool | true | Enable LISTEN/NOTIFY for low-latency delivery. See the broker.postgres.use_notify note for connection-pooler caveats |
notify_dsn | string | "" | Separate DSN for the LISTEN connection. Use a direct PostgreSQL URL when dsn points at PGBouncer or another pooler incompatible with LISTEN/NOTIFY |
partition_retention_days | int | 1 | Days to keep old partitions before dropping |
partition_lookahead_days | int | 2 | Future daily partitions to pre-create |
partition_cleanup_interval | duration | "1m" | How often to run partition maintenance |
skip_schema_init | bool | false | Skip automatic schema creation on startup |
Read replica support
The controller supports routing read operations (outbox polling) to a PostgreSQL replica while keeping writes on the primary:
{
  "controller": {
    "enabled": true,
    "type": "postgres",
    "postgres": {
      "dsn": "postgres://user:password@primary:5432/centrifugo?sslmode=disable",
      "use_notify": true,
      "replica": {
        "dsn": ["postgres://user:password@replica:5432/centrifugo?sslmode=disable"],
        "pool_size": 4
      }
    }
  }
}
LISTEN/NOTIFY always uses the primary connection (PostgreSQL limitation), but the outbox polling query runs on the replica, reducing primary load.
Multi-tenant table prefix
For multi-tenant setups where several Centrifugo clusters share the same PostgreSQL database, use distinct table_prefix values:
{
  "controller": {
    "enabled": true,
    "type": "postgres",
    "postgres": {
      "dsn": "postgres://user:password@localhost:5432/shared_db?sslmode=disable",
      "table_prefix": "prod_us_cf"
    }
  }
}
This produces tables like prod_us_cf_controller_messages, prod_us_cf_controller_shard_lock, etc.
Database objects created
The controller creates and manages the following objects (shown with default cf prefix):
| Object | Type | Description |
|---|---|---|
cf_controller_messages | partitioned table | Control message outbox, partitioned by created_at (daily) |
cf_controller_shard_lock | table | Per-shard serialization lock rows |
cf_controller_schema_version | table | Schema version tracking |
cf_controller_publish | function | Atomic INSERT + NOTIFY with shard lock serialization |
PostgreSQL-only multi-node deployment
With the PostgreSQL controller, stream broker, and map broker, you can run a multi-node Centrifugo cluster using PostgreSQL as the only infrastructure dependency:
{
  "broker": {
    "enabled": true,
    "type": "postgres",
    "postgres": {
      "dsn": "postgres://user:password@localhost:5432/centrifugo?sslmode=disable",
      "use_notify": true
    }
  },
  "map_broker": {
    "type": "postgres",
    "postgres": {
      "dsn": "postgres://user:password@localhost:5432/centrifugo?sslmode=disable",
      "use_notify": true
    }
  },
  "controller": {
    "enabled": true,
    "type": "postgres",
    "postgres": {
      "dsn": "postgres://user:password@localhost:5432/centrifugo?sslmode=disable",
      "use_notify": true
    }
  }
}
All three components can share the same PostgreSQL database — they use separate table namespaces (cf_stream_*, cf_map_*, cf_controller_*). Each manages its own schema, partitions, and cleanup independently.
Centrifugo PRO extends the controller story with Redis and Nats custom controllers, letting you run channel traffic over one backend and controller traffic over another for isolation.